Featured Post

Privacy Policy

I'm working on a new privacy policy for my followers, but for now you should know that if you comment on my site, my site collects your ...

Saturday, January 27, 2024

Floral Embossed Birthday Card


Happy Saturday my crafty friends! Today I have a birthday card that's made using and
embossing folder, die and a stamp. The embossing folder is the new Flowers and Foliage 3D Embossing Folder by Wendy Vecchi from Spellbinders.

To make my card, I started my ink blending orange inks on the bottom half, then put only the top half of the panel in the embossing folder and ran it through my machine.

Diamond Dotz were glued to the center of the flowers and thin black glitter washi tape was glued below the flowers. This was then glued to a slightly larger black panel and glued to a top folding white card.

The sentiment from the So Many Sentiments Set was die-cut from white and black cardstock and popped up on the card.

Happy Birthday from the Party Time Set was stamped with Onyx Black VersaFine Ink.


Here is another card that I made using the Flowers and Foliage 3D Embossing Folder. This time I embossed decorative paper with the image pressed down into the paper then painted the flowers with white paint and used enamel dots for the center of the flowers.

To make the shaker portion, 3D Foam Circle Frames from Scrapbook Adhesives by 3L were used. These frames make it super easy to make a shaker! The sentiment was die-cut using Thanks Enclosed Sentiments set


Affiliate and Product Disclosure
I am on various Design Teams and get free goodies for blogging about craft products but only because I love their products and genuinely use them. Ultimately my opinions are my own. A list of companies is in my sidebar.


Birthday Wish Card


Hi my friends, today I have a birthday card made with Simon Hurley's new collection from Spellbinders. I usually make girly color birthday cards but with a few boy birthdays coming up, I thought I would use blue orange and terracotta colors.

To make my card, I used the Big Hugs Stamp and Die Bundle and stamped the cat, present and balloon on watercolor paper with Onyx VersaFine Ink and used Derwent Inktense watercolor pencils to color it. Once it was dry, the coordinating dies were used to cut it out.

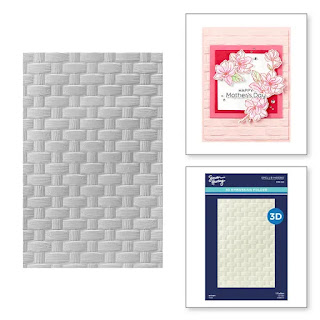
To make the background, terracotta cardstock was embossed using the Woven 3D Embossing Folder and glued onto a top folding white card that had blue ink blended on the edges.


A frame was made using the Essential Arches Etched Dies from white cardstock and sponged with blue ink.

The sentiment from the set was stamped on a strip of terracotta cardstock with VersaMark ink and embossed with white embossing powder.

For those who only want the Big Hugs Clear Stamp Set, Spellbinders has that too.

 \Have a crafty day!

Let's Connect!

Affiliate and Product Disclosure
I am on various Design Teams and get free goodies for blogging about craft products but only because I love their products and genuinely use them. Ultimately my opinions are my own. A list of companies is in my sidebar.

Make A Wish Birthday Card


Hi my friends, today I have a birthday card made with Simon Hurley's new collection from Spellbinders. I usually make girly color birthday cards but with a few boy birthdays coming up, I thought I would use blue orange and terracotta colors.

To make my card, I used the Big Hugs Stamp and Die Bundle and stamped the cat, present and balloon on watercolor paper with Onyx VersaFine Ink and used Derwent Inktense watercolor pencils to color it. Once it was dry, the coordinating dies were used to cut it out.

To make the background, terracotta cardstock was embossed using the Woven 3D Embossing Folder and glued onto a top folding white card that had blue ink blended on the edges.


A frame was made using the Essential Arches Etched Dies from white cardstock and sponged with blue ink.

The sentiment from the set was stamped on a strip of terracotta cardstock with VersaMark ink and embossed with white embossing powder.

For those who only want the Big Hugs Clear Stamp Set, Spellbinders has that too.

 \Have a crafty day!

Let's Connect!

Affiliate and Product Disclosure
I am on various Design Teams and get free goodies for blogging about craft products but only because I love their products and genuinely use them. Ultimately my opinions are my own. A list of companies is in my sidebar.

Friday, January 19, 2024

Colorful Flower Birthday Card


Hi my crafty friends! Today I have another card made using the Colorful Burst Flower Etched Die from Spellbinders. These fun and funky flowers scream bold colors to me but even though my flowers were die-cut from pastels, the background is bold and bright.

To make the background, yellow and orange Distress Inks were blended on white cardstock using blender brushes and the flowers were glued onto the blended card.

The sentiment it from the Popular Sentiments Etched Die that has bold lettering that works perfectly with the bold flowers.

\Have a crafty day!

Let's Connect!

Affiliate and Product Disclosure
I am on various Design Teams and get free goodies for blogging about craft products but only because I love their products and genuinely use them. Ultimately my opinions are my own. A list of companies is in my sidebar.


Wednesday, January 10, 2024

Fun Floral Card


Today I have a fun floral card made using the new release Fresh Picked Berries Etched Die Set from Spellbinders along with other dies, stamps and stencils from their collection. Just click on the highlighted words to go to the Spellbinders site for that product.


***The image was die-cut from green, yellow, orange and purple papers. The stem was sponged with green ink that was darker than the paper to add a touch of contrast.

***The berries were glued to an black and purple oval frame made using Fran's Frames. I thought it would look nice against the black and that it would make it pop, while the outer purple frame pulls the colors together.


***A black panel was stenciled with Unicorn Ink, using the Diagonal Buffalo Plaid Stencil, on the left side. Sequins were glued down one row of the stenciled image.


***The sentiment was made using the Snowflake Wishes Stamp and Die Set, but don't let the name fool you, this set has sentiments for many occasions, not just Christmas.


\Have a crafty day!

Let's Connect!

Affiliate and Product Disclosure
I am on various Design Teams and get free goodies for blogging about craft products but only because I love their products and genuinely use them. Ultimately my opinions are my own. A list of companies is in my sidebar.


Saturday, December 30, 2023

House Mouse Thinking of You Card


House-Mouse stamps are the cutest. I used this "We Heart You" stamp that comes with the sentiment to make a thinking of you card. I'm thinking of switching out the sentiment to make this a Valentine's Day card too.

This is a simple card to make since it fills up the card and you don't have to worry about the layout. The image was stamped with Onyx Black VersaFine ink and colored with Prisma Colored Pencils. Adhesives from Scrapbook Adhesives were used to stick things down and to pop them up.

You can see the House-Mouse collection at Spellbinders HERE

SALE
PLUS SPELLBINDERS IS HAVING A HUGH NEW YEAR SALE WITH GREAT DEALS! CHECK IT OUT HERE

Have a creative day :)

 Have a crafty day!


Let's Connect!

Affiliate and Product Disclosure
I am on various Design Teams and get free goodies for blogging about craft products but only because I love their products and genuinely use them. Ultimately my opinions are my own. A list of companies is in my sidebar.

Friday, December 29, 2023

Warm Birthday Wishes Card


 I'm making a few winter birthday cards using this Knit One, you can see it here https://shrsl.com/4d048 on the Spellbinders site.


Knit One, House-Mouse Designs from Spellbinders


To make my card, the image was stamped with Onyx Black VersaFine Ink and colored with Prisma Colored Pencils. It was then layered onto pink cardstock and glued to a card that was covered with decorative paper.
The sentiment from the set was stamped on the same decorative paper and layered onto silver glitter paper, the adhesives I used are from Scrapbook Adhesives BY 3L.

Have a creative day and stay warm! :)

Have a crafty day!

Let's Connect!

Affiliate and Product Disclosure
I am on various Design Teams and get free goodies for blogging about craft products but only because I love their products and genuinely use them. Ultimately my opinions are my own. A list of companies is in my sidebar.