Featured Post

Privacy Policy

I'm working on a new privacy policy for my followers, but for now you should know that if you comment on my site, my site collects your ...

Wednesday, June 22, 2022

Life is Better at the Beach


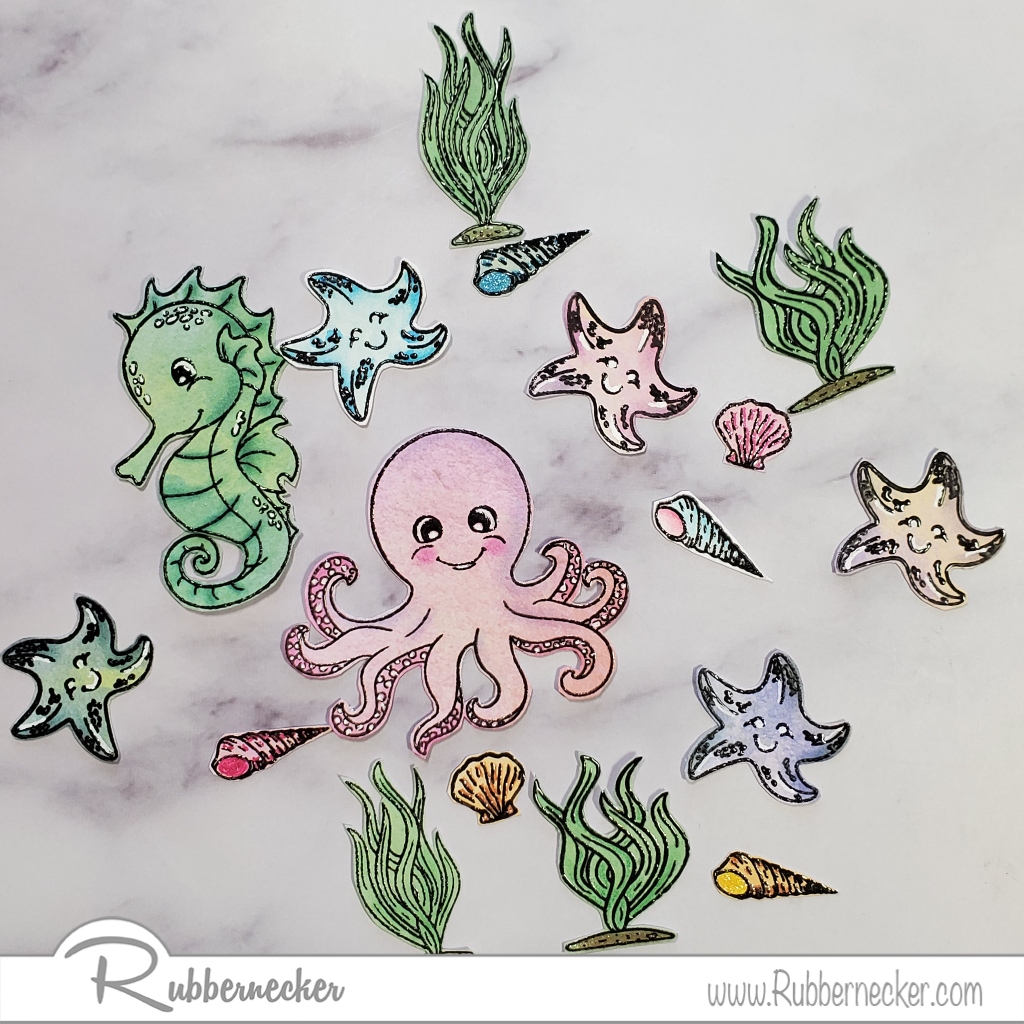
I have this card up on the Rubbernecker Stamps Blog, it's using the new Every Summer Set for a clean and simple design.

  • Stamp images from the Every Summer Set onto watercolor paper with VersaFine Onyx Black Ink and emboss with clear embossing powder.
  • Watercolor the images using Inktense Pencils, cut out and set aside.


  • Glue strips of Printworks Specialty Paper diagonally on a white cardstock panel.
  • Die-cut the panel using the Nested Rectangle Stitch Die Set.

  • Die-cut the center of this panel using the Nested Oval Die Set.


  • Pop the panel up on a larger white cardstock panel using foam squares then glue to an orange card.


  • Ink the sentiment with Bubblegum and Apricot Color Fuse Inks on a strip of white cardstock and glue it to the top of the colored strips.
  • Pop up the octopus also using foam squares and glue the starfish down below the oval.


Click on the items below to go to the Rubbernecker Stamps online shop.

Have a crafty day!

Let's Connect!

Affiliate and Product Disclosure
I am on various Design Teams and get free goodies for blogging about craft products but only because I love their products and genuinely use them. Ultimately my opinions are my own. A list of companies is in my sidebar.

Wednesday, June 15, 2022

4th of July Foil Flag Card


Since 4th of July is right around the corner, I have a surprisingly easy flag card made using adhesives and Metallic Transfer Foil from Scrapbook Adhesives by 3L and it's up on their Blog today.

Place strips of Premium Double-Sided Tape 1/2" on a white cardstock panel, to fill the panel but leave spaces between the tape.


Remove the paper liner on the tape and place red foil from the Metallic Transfer Foil Sheets Celebrate Colors on top of the tape with the pretty side up. Rub the foil with your finger, then remove the foil.


Trim off the white cardstock at the bottom of the pane, then layer this onto a slightly larger white cardstock panel using the E-Z Rubber Grand and set aside.


Place an Adhesive Sheet 4" x 6" on the same size piece of white cardstock and cut a piece to 2" x 2 1/2", save the rest to use later.
Remove the paper liner from the cut piece and place blue foil on the top with the pretty side up.  Rub the foil sheet and remove the foil carrier from the panel.

Using a craft knife, remove the stars from the E-Z Runner Stars and place them on the blue foil panel until it is filled.  Sprinkle this with Crystal Micro glitter, rub in the glitter and shake off excess.  Return the unused glitter to the jar and attach the panel to the left upper corner of the red foil striped panel using the E-Z Runner Grand.


Stamp the sentiment on vellum with VersaMark Ink and emboss with black embossing powder.  Die-cut using a tag die and tie the top with red and white twine.  Attach the tag diagonally to the right side of the flag using the E-Z Runner Permanent Fine Adhesive, it's pretty much invisible through the vellum.

Use the E-Z Runner Grand to attach the flag to a top folding dark blue card.


Skill Level: Intermediate


Materials Needed:

Scrapbook Adhesives by 3L® E-Z Runner Grand Refillable Dispenser E-Z Runner Stars Refillable E-Z Runner Permanent Fine Adhesive Metallic Transfer Foil Sheets Celebrate Colors Adhesive Sheets 4" x 6"


Home Hobby by 3L® Dual Tip Glue Pen Premium Double-Sided Tape 1/2"

Have a crafty day!

Let's Connect!

Affiliate and Product Disclosure
I am on various Design Teams and get free goodies for blogging about craft products but only because I love
their products and genuinely use them. Ultimately my opinions are my own. A list of companies is in my sidebar.


Tuesday, June 7, 2022

Lazy Hazy Days of Summer


Who's ready for the lazy hazy days of summer?  I say bring it on!!!  This card was made using the new release Every Summer Set to get you started on your summer journey.
Here's how my card was made-
  • Stamp the images from the Every Summer Set on watercolor paper with Onyx Black VersaFine Ink, watercolor using Zig Clean Color Real Brush Pens, cut them out and set aside.  Or if you don't like to color or have decorative paper that you'd like to get rid of, just stamp and emboss on the decorative paper and cut them out.
  • The images below were colored with Zigs.

  • The images below were stamped on decorative paper and shadowed with decorative chalks using a flat brush.  Once the chalk is used, it doesn't rub off, no need to put anything on top of it.
  • Stamp a white cardstock panel that's slightly smaller than a card and stamp the sentiment from the set on the upper right side with Dreamer Color Fuse Ink.
  • Sprinkle some Golden Sand Embossing Powder below the sentiment and emboss it from underneath the paper so that the embossing powder doesn't blow off.

  • Die-cut the top of a piece of cardstock, any color using the wave die from the Wave Die Cut and use it as a stencil to color blend the waves on a white cardstock panel using Color Fuse Inks #9 Set.
  • Once done, die-cut the waves panel using the Nested Oval Stitch Die Cut Set and also die-cut white cardstock with the same set using a die one size larger.
  • Glue the two ovals together and set them aside.

  • Die-cut white cardstock using the Slimline OPC Fish Scales Die, glue it to the left side of the white cardstock panel and trim off the excess from the top and the bottom.  

  • Now assemble the card by glueing the seashells and seaweed over the Golden Sand embossed area.
  • Glue the Slimline OPC Fish Scales Die, to the left side of the white cardstock panel and trim off the excess from the top and the bottom of the panel.  
  • Glue the panel to a light blue card.
  • Glue the two ovals together and pop it up using foam squares and place it over the Fish Scales Die piece.
  • Pop up the seahorse on top of the waves.
  • Add two enamel dots at the top right of the card.


 Click on the product below to go to the Rubbernecker Stamps online shop.

Have a crafty day!

Let's Connect!

Affiliate and Product Disclosure
I am on various Design Teams and get free goodies for blogging about craft products but only because I love their products and genuinely use them. Ultimately my opinions are my own. A list of companies is in my sidebar.

Wednesday, June 1, 2022

My Dad Rocks


Happy June my crafty friends! I have this Father's Day card up on the

Scrapbook Adhesives by 3L Blog today. It's made using crafty adhesives

from Scrapbook Adhesives by 3L, decorative paper from ColorPlay the

Rad Dad Pack, Sizzix Memory Maker Stamp & Die Set aCircle Embossing Folder

and the Stampendous Deckle Die Set.


Have a crafty day!

Let's Connect!

Affiliate and Product Disclosure
I am on various Design Teams and get free goodies for blogging about craft products but only because I love
their products and genuinely use them. Ultimately my opinions are my own. A list of companies is in my sidebar.