Featured Post

Privacy Policy

I'm working on a new privacy policy for my followers, but for now you should know that if you comment on my site, my site collects your ...

Sunday, January 30, 2022

Friend


 This new Floral Flutter from Stampendous is so big and beautiful!  It was colored with Prisma Colored Pencils and cut out.  The sentiment is from the Vertical Wishes stamp, it was stamped with black ink, the word was cut out and sponged with purple ink then popped up in the center of the butterfly.

Let's connect!


Disclaimer- I get free goodies for blogging about craft products! Today I'm sharing a card made with products from Stampendous

Sunday, January 23, 2022

Floating Strips Card


Happy New Year, I hope you all have a very crafty 2022!  Today I'm starting off the new year on the Scrapbook Adhesives by 3L blog with this "floating strips" background card made with Stampendous stamps.  Be sure to head on over there to see all of the details on how this card was put together!
Have a crafty day!


Let's Connect!

Affiliate and Product Disclosure
I am on various Design Teams and get free goodies for blogging about craft products but only because I love their products and genuinely use them. Ultimately my opinions are my own. A list of companies is in my sidebar.


Wednesday, January 19, 2022

Friends are Always in My Heart


Stamp the flower and stem from the Summer Bloom Set with Color Fuse Ink sets #1, #5 and #10, there are layering directions in all of the layered stamp sets.
Die-cut the images using the coordinating Summer Bloom Die Set and set aside.


Die-cut white cardstock using the Lattice Cover Die and layer this to purple decorative paper that's the same size.


Die-cut silver cardstock using the Stacked Butterflies, you'll have extras to use on other projects, I keep my extras in the bag with the die.


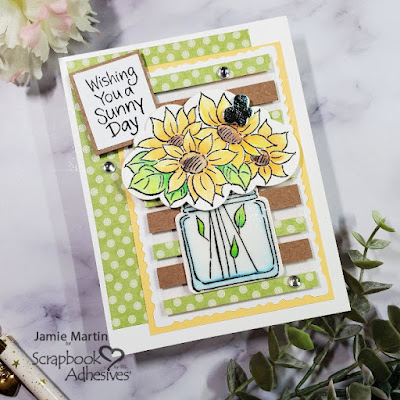
Now it's time to put it all together.  Glue one flower and stem to the left side of the card and pop up the second flower and stem using 3D Foam Squares.
The butterflies wings were curved and only the body was glued to the card and foam squares were placed under the wings to keep them up.
Self-adhesive pink pearls were added to the body.
The sentiment from the set was stamped on white cardstock and layered onto black cardstock, then popped up on the card.
A small butterfly was added to the corner of the sentiment.


Click on the products below to go to the Rubbernecker Stamps online shop.

Saturday, January 15, 2022

Birthday Shaker Card


Hi, today I have this birthday shaker card up on the Scrapbook Adhesives by 3L Blog with a tutorial on how to make this card and which adhesives are best. Hop on over there and see how easy it is to make this shaker card!


Plus
Rubbernecker Stamps- Stamps and Dies
Stampendous- Glass Glitter
PrintWorks- Succulent Cardstock
Have a crafty day!

Let's Connect!

Affiliate and Product Disclosure
I am on various Design Teams and get free goodies for blogging about craft products but only because I love their products and genuinely use them. Ultimately my opinions are my own. A list of companies is in my sidebar.
Being part of various affiliate programs – when you click on an affiliate link and then go on to make a purchase, at no cost to you, I receive a small commission.  The affiliates I use include Rubbernecker Stamps.

Tuesday, January 11, 2022

A House-Mouse Birthday


Have you seen all of the House-Mouse Designs that Stampendous has in their new catalog?!  They are oh my gosh so cute!  I like them on my cards but not in my house hahahaha.

Here's how my card was made-

  1. I stamped the Birthday Cupcake on white card stock with Onyx Black VersaFine Ink and colored it with Prisma Colored Pencils.
  2. I used a brick stencil to add bricks in the background.  I didn't do any masking, I was just careful and it worked out!
  3. The panel was layered onto blue cardstock and mounted to a white panel measuring 
  4. 4" x 5 1/4".
  5. Place two of Extreme Double-Sided Tape above and below the image as shown. Remove the liner of the wider tape, sprinkle with embossing powder from the Mermaid Sea 5-Jar Embossing Powder Kit and emboss. Remove the liner of the thinner tape, sprinkle with another color from the Kit and emboss.
  6. Stamp sentiment on white cardstock that has been stenciled with bricks, with black ink.
  7. Use the oval die from the  POP Frame Die Set to die-cut the sentiment and layer it on green cardstock that was cut using a die from the same set.
  8. Pop the sentiment up on the card with foam squares.
Be sure to share your projects made with Stampendous products on the Stampendous! Fans Facebook page, we'd love to see what you're making!!

Let's connect!


Disclaimer- I get free goodies for blogging about craft products! Today I'm sharing a card made with products from Stampendous


Wednesday, January 5, 2022

I'm Here For You!


Let friends and family know that you're there for them with this cute Woodland Animals #3 Set from Rubbernecker Stamps.
Here's how my card was made-
  • Stamp the images from the Woodland Animals #3 Set on Bristol Smooth paper with Onyx Black VersaFine Ink and emboss with Clear Embossing Powder. Watercolor using Zig Clean Color Real Brush Pens.
  • Die-cut the images with Woodland Animals #3 and set them aside.


  • Stamp and emboss the tree on white cardstock and die-cut using Nested Tag Stitch Die Set.
  • Die-cut two different shades of green cardstock with the Slimline Grass Die.
  • Place one of the die-cut grass papers on the tag and replace the same Nested Tag Stitch Die over the tag so you know how high up the grass will go.
  • Remove the tag and die-cut the grass with the tag die.


  • Stipple different colors of green above the tree for the leaves.


  • Stamp the left side of a white panel with the Diagonal Stripes stamp using black ink.


  • Stamp black dots on the white panel with one of the stamps from the Watercolor Splatter set and edge it with a strip of black glitter washi tape.
  • Stamp the sentiment at the top right corner and pop up the images on the tag. 
  • Layer the tag onto a black tag, add ribbon and twine then pop it us diagonally on the panel.
  • Glue the panel to a green card. 

Click on the images below to go to the Rubbernecker Stamps online shop.

Plus
PrintWorks- Cardstock
Scrapbook Adhesives by 3L- Adhesives (3D Foam Circles, Dual Tip Glue Pen) E-Z Runner Grand)
Stampendous!- Clear Embossing Powder

Have a crafty day!

Let's Connect!

Affiliate and Product Disclosure
I am on various Design Teams and get free goodies for blogging about craft products but only because I love their products and genuinely use them. Ultimately my opinions are my own. A list of companies is in my sidebar.
Being part of various affiliate programs – when you click on an affiliate link and then go on to make a purchase, at no cost to you, I receive a small commission.  The affiliates I use include Rubbernecker Stamps.

Saturday, January 1, 2022

Gardeners of Our Souls Slimline Card


Happy 2022, I hope you all are having a good start to the year!  Today I have a card made with a new slimline stamp from Stampendous, Slim Pop Blooms.  If they aren't in your local stamp/scrap store, they should be soon!!

I colored the flowers with Prisma Colored Pencils and then shadowed around the top of them with blue decorative chalk using a flat brush.
It was then layered onto a pink card using PrintWorks Cardstock.
A sentiment from the True Friends Perfectly Clear Set, was stamped with Onyx Black VersaFine Ink and "Friends" was outlined with a pink pencil, layer onto a pink circle and popped up using adhesives from Scrapbook Adhesives by 3L.

Let's connect!


Disclaimer- I get free goodies for blogging about craft products! Today I'm sharing a card made with products from Stampendous