Featured Post

Privacy Policy

I'm working on a new privacy policy for my followers, but for now you should know that if you comment on my site, my site collects your ...

Sunday, October 24, 2021

Enjoy Today


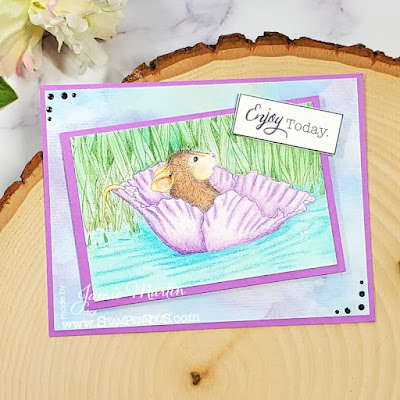
 Hi, I hope you're enjoying your day just like this cute little mouse is floating down the river.  The stamp is Stream Float from Stampendous.  

Sometimes House-Mouse Designs stamps might look a little intimidating to color, but I have a hack for you.  

I colored the mouse and flower with Prisma Colored Pencils and the hack comes in for the background.  I used decorative chalks (Jane Davenport) to color the grass by using a flat paintbrush and green chalk, I then shade some of the grass blades with pencils.  I did the same for the water using blue chalk the using a darker blue pencil to do the shading, this saves a ton of time.

The background watercolor paper is from a decorative paper pack that I picked up at Hobby Lobby, it looks like it was handmade!

Let's connect!


Disclaimer- I get free goodies for blogging about craft products! Today I'm sharing a card made with products from Stampendous

Tuesday, October 19, 2021

Slimline Fall Thank You


Today I have a Fall slimline thank you card with a burlap frame that makes a pretty background for leaves.  Here's how it was made-

  • Die-cut burlap using the Slimline OPC Scallop Die.  I use the Crossover ll that Rubbernecker carries because you can adjust the pressure by turning a knob on top, so you don't have to mess around with changing out plates.  It really is wonderful, quick and easy!

  • Attach the die-cut burlap to a cream-colored panel that is slightly smaller than the burlap.

  • Next die-cut leaves in Fall colors of cardstock and glue them to all three of the openings.

  • Stamp "Thank you" in each of the openings using the sentiment from the Best Wishes Etc clear set using Pumpkin Color Fuse Ink.

  • Layer the slimline piece to a slightly larger piece of decorative paper.
  • Now to dress it up a little, black and white ribbon was tied into bows for each of the leaf clusters and Ebony Black Nuvo Crystal Drops were randomly placed around each thank you.


Click on the images below to go the Rubberneck Stamps online shop.
Have a crafty day!

Let's Connect!

Affiliate and Product Disclosure
I am on various Design Teams and get free goodies for blogging about craft products but only because I love their products and genuinely use them. Ultimately my opinions are my own. A list of companies is in my sidebar.
Being part of various affiliate programs – when you click on an affiliate link and then go on to make a purchase, at no cost to you, I receive a small commission.  The affiliates I use include Rubbernecker Stamps.

Friday, October 15, 2021

Spooky Halloween


I don't know if you've noticed, but I like to make my cards using techniques that aren't too time-consuming and this Halloween card is one of those.


  • I started out by stamping the Slimline Spooky Scene on white cardstock with VersaMark Ink and embossed it with black embossing powder.
  • Then use the Clouds Stencil to add yellow, purple and pink inks using blender brushes.


  • This was then die-cut using the Slimline Nested Die, the largest one.
  • It was then layered to a slightly larger black panel and popped up on an orange card.


  • The sentiment was made by individually stamping the letters from the Toy Blocks and Letters Combo with VersaMark ink on black cardstock and embossed with white embossing powder.
  • Pop it up on the right side of the card with foam squares and add a orange enamel dot.


Cardstock- Printworks
Blender Brushes- Taylored Expressions
Inks- Distress Inks
Have a crafty day!

Let's Connect!

Affiliate and Product Disclosure
I am on various Design Teams and get free goodies for blogging about craft products but only because I love their products and genuinely use them. Ultimately my opinions are my own. A list of companies is in my sidebar.
Being part of various affiliate programs – when you click on an affiliate link and then go on to make a purchase, at no cost to you, I receive a small commission.  The affiliates I use include Rubbernecker Stamps.

Winter Wishes Christmas Tag


Hi, today I have a Christmas gift tag that's not just a tag but also part of the gift since it's reusable! Head on over to the Scrapbook Adhesives by 3L Blog to find out just how easy this is to make and what adhesives to use.


Rubbernecker Stamps- Die used for the frames (click on graphic below).
Wendy Vecchi- Holly from Warm Wishes Stamp, Die and Stencil Set.

Have a crafty day!

Let's Connect!

Affiliate and Product Disclosure
I am on various Design Teams and get free goodies for blogging about craft products but only because I love their products and genuinely use them. Ultimately my opinions are my own. A list of companies is in my sidebar.

Wednesday, October 6, 2021

Autumn Thank You


Die-cut leaves from the Leaf Die Set using PrintWorks white cardstock.


Use blender brushes or sponges to add Color Fuse Ink from sets #2, #3, and #11.  Make the solid leaves a little darker than the open-cut leaves.
Glue the open-cut leaves to the matching solid leaves and set aside.


For the background, I had previously made a background using the new Plaid Texture Stencil using Carved Pumpkin Distress Oxide Ink.  The stencil had a lot of ink on it when I was done, so rather than wasting it, I spritzed it with water, placed a piece of watercolor paper on top and gave it a little rub. This gave me a pretty background.
Die-cut the watercolor paper with a die from the Nested Rectangle Stitch Die Cut Set and layer it onto a slightly larger rust panel.  Apply foam squares to the pack and pop it up on a light orange card.


Glue the green and brown leaves to the panel as shown and pop us the green leaf using foam squares.
Die-cut the You Script w/Shadow Die from green and orange papers, glue together as shown and glue to the panel.
Stamp "Thank" from the Best Wishes Set with black ink on a strip of orange paper. Pop it up on the panel as shown.
Add gold glitter enamel dots to the card as shown


Have a crafty day!

Let's Connect!

Affiliate and Product Disclosure
I am on various Design Teams and get free goodies for blogging about craft products but only because I love their products and genuinely use them. Ultimately my opinions are my own. A list of companies is in my sidebar.
Being part of various affiliate programs – when you click on an affiliate link and then go on to make a purchase, at no cost to you, I receive a small commission.  The affiliates I use include Rubbernecker Stamps.

Friday, October 1, 2021

A Sparkly BOO To You


Happy October 1st!  To start off October with a Halloween card that's a little sparkly and a little spooky up on the Scrapbook Adhesives by 3L Blog today.  Head on over to check out how my card was made and what adhesives were used.

Dies, Stencil, Inks- Rubbernecker Stamps
Black Glitter- Stampendous
Cardstock  & Glitter Paper- PrintWorks


Rubbernecker Products Used
 
Have a crafty day!

Let's Connect!

Affiliate and Product Disclosure
I am on various Design Teams and get free goodies for blogging about craft products but only because I love their products and genuinely use them. Ultimately my opinions are my own. A list of companies is in my sidebar.