Featured Post

Privacy Policy

I'm working on a new privacy policy for my followers, but for now you should know that if you comment on my site, my site collects your ...

Wednesday, April 20, 2022

Love and a Dog Mini Slimline Card


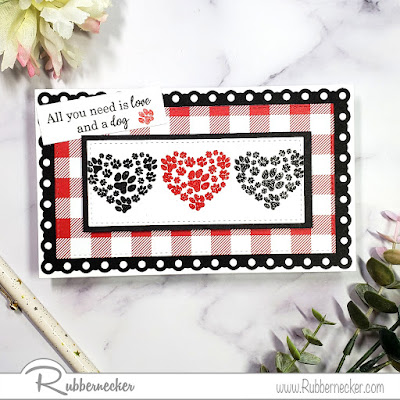
Today I have a mini slimline card using the new Dogs Front and Back from Rubbernecker Stamps.  I love the paw heart from the set, it's just the cutest.  I thought I'd make a bold card using red, black and white, the colors look great together.  

Here's how I made my card-
Die-cut white cardstock using the Mini Slimline Nested with Stitch Die.
Stamp the heart from the Dogs Front and Back Set in the center of the die-cut panel with VersMark Ink and emboss it with Red Tinsel Embossing Powder. Then stamp the heart again, one on each side to the embossed heart also with VersaMark Ink, but this time emboss it with Twilight Embossing Powder.


Die-cut red and white decorative paper using a larger die from the Mini Slimline Nested with Stitch Die and layer it onto a black cardstock panel that was die-cut using the Mini Slimline Scallop Holes Die.


Mount this to a white slimline card and pop up the heart's panel using foam squares.


Stamp the sentiment from the set onto a strip of white cardstock with Onyx Black VersaFine Ink and stamp the little paw also from the set with Crimson Color Fuse Ink and glue it diagonally to the left corner.


Click on the product below to go to the Rubbernecker Stamps Online Shop.

Have a crafty day!

Let's Connect!

Affiliate and Product Disclosure
I am on various Design Teams and get free goodies for blogging about craft products but only because I love their products and genuinely use them. Ultimately my opinions are my own. A list of companies is in my sidebar.
Being part of various affiliate programs – when you click on an affiliate link and then go on to make a purchase, at no cost to you, I receive a small commission.  The affiliates I use include Rubbernecker Stamps.

Friday, April 15, 2022

Happy Birthday Mini Slimline Card


Hi my friends, I have a beautiful watercolor card without the water coloring, it doesn't get any easier than that!. My card was made using a 6" x 6" paper pad, along with a mini slimline die from Rubbernecker Stamps and of course Adhesives from Scrapbook Adhesive by 3L.

With this sheet from the decorative paper pad, you can make two cards using a mini slimline die and you can move the die side to side to get the look that's right for you. Once you have your die the way you want it, run it through your die-cutting machine.


Next, a piece of decorative paper from the same pack was cut slightly larger than the 
die-cut piece and then a decorative panel was cut to fit on the front of a white slimline 
card to completely cover the card without any borders.


To attach the top two layers, the E-Z Runner Dots Permanent was used.


Two strips of 3D Foam Strips White Large were placed on the back of the
dark-colored panel, so this could be popped up on the pink panel.


Two butterflies were cut out from one of the paper pack pages and layered
on top of each other with E-Z Dots Permanent Runner placed only the body of the
top butterfly so that the wings of the top butterfly can be bent up.
Place an Adhesive Dot on each of the wings of the bottom butterfly.


The tags also from the paper pad set were layered using E-Z Dots.


3D Foam Strips were placed on the back of the tag and a cutout leaf and flower were attached to the back as shown.


Then the butterfly was placed at the top right with the tag just below it.


Skill Level: Intermediate Creative Time: 35 minutes

Materials Needed:

Scrapbook Adhesives by 3L® Adhesive Dots 3D Permanent Adhesive Lines Permanent Adhesive Dots Micro Permanent

3D Foam Strips White Large

E-Z Dots Dispenser


Plus

Kaisercraft- Amethyst Paper Pad

Stampendous- Ultra Fine Glitter


Wednesday, April 6, 2022

Good Friends, Great Adventures


Hi my crafty friends, today I have a fun card made with the Group of Friends Set from Rubbernecker Stamps, and they sure do look like a fun bunch.

  • Using a stamping tool such as a Misty, stamp the Wildflower Background on white cardstock with Blush Color Fuse Ink from Set #2.
  • Clean your stamp and stamp again with VersaMark Ink and emboss it with Clear Embossing Powder.
  • Die-cut the stamped panel using the Nested Rectangle Frame w/ Stitches.
  • Now die-cut pink cardstock with the Nested Scallop w/ Half Holes and layer the stamped panel onto this.


  • Place foam squares on the back of the pink panel, make sure to use enough of the squares so when it's mounted to the card, you don't have any sagging.


  • Cut black cardstock slightly smaller than a white card and use a tape runner to mount the black panel.
  • Pop up the flower panel on top of this.


  • Stamp the animals from the Group of Friends Set onto watercolor paper with Onyx Black VersaFine Ink and emboss with Clear Embossing Powder.
  • Watercolor the image with Zig Clean Color Real Brush Pens and cut out.


  • Die-cut white cardstock using the Flower #6 Die Cut.


  • Glue the Flower #6 Die Cut to the card and pop up the animals over this using foam squares.


  • Stamp the sentiment from the set on a black cardstock strip with VersaMark Ink and emboss with White Embossing Powder.
  • Place a foam square under the right and left sides and pop it up over the bottom of the animals.
  • For the final touch add pink enamel dots on each side of the sentiment and black polka dot enamel dots around the animals. 


Adhesives- Scrapbook Adhesives by 3L
Cardstock Black, White, Pink- PrintWorks Specialty Paper 

Click on the product below to go to the Rubberneck Online Shop

Have a crafty day!

Let's Connect!

Affiliate and Product Disclosure
I am on various Design Teams and get free goodies for blogging about craft products but only because I love their products and genuinely use them. Ultimately my opinions are my own. A list of companies is in my sidebar.
Being part of various affiliate programs – when you click on an affiliate link and then go on to make a purchase, at no cost to you, I receive a small commission.  The affiliates I use include Rubbernecker Stamps.

Tuesday, April 5, 2022

Uniquely Authentic


Today is New Release Day for Rubbernecker Stamps and they have some super cute animal sets along with a few background stamps.

For my card, I used the Yoga Dogs Set and it comes with so many cute sayings, that it was hard to pick which one to use but I finally did it!  Be sure to head on over to the Rubbernecker Stamps Blog to see all that they have, you'll be glad that you did!

Click on the product to go to the Rubbernecker Stamps Online Shop.

Plus
Scrapboook Adhesives by 3L- All Adhesives
Printworks Specialty Paper- Cardstock, White & Green

Have a crafty day!

Let's Connect!

Affiliate and Product Disclosure
I am on various Design Teams and get free goodies for blogging about craft products but only because I love their products and genuinely use them. Ultimately my opinions are my own. A list of companies is in my sidebar.
Being part of various affiliate programs – when you click on an affiliate link and then go on to make a purchase, at no cost to you, I receive a small commission.  The affiliates I use include Rubbernecker Stamps.


Friday, April 1, 2022

Gift Box For All You Do!


Hi my friends, today I have a gift box with some pretty Spring time elements and Scrapbook Adhesive by 3L has everything you'll need to keep things stuck together, stuck down, and popped up!.

  • To make my box I used a box die from Concord & 9th to cut thick decorative cardstock that's white with silver polka dots.  
  • The box is made using two dies, the front and the back, each piece has a tab that attaches to the other piece.  
  • Strips of Premium Double Sided-Tape were placed on each flap to attach the two pieces of the box.


  • Two ovals were die-cut from white cardstock, one piece was stamped with a sentiment from Rubbernecker Stamps Friends Etc Set using VersaMark Ink and embossed with Sterling Silver Embossing Powder from Stampendous. 
  • The second piece had Leaf Green Archival Ink blended on it then E-Z Dots Permanent Runner was used to attach the green piece behind the sentiment as shown.

  • The sentiment piece was then popped up using 3D Foam Squares White Mix, then set the box aside.

  • A Blossoms Chippie by Wendy Vecchi from Ranger Ink was rubbed with VersaMark Ink, then embossed with a translucent pink glitter embossing powder from the Spring Sparkle Embossing Powder Set from Stampendous. 
  • A yellow enamel dot from Queen & Co was placed in the center.

  • A leaf Chippie from the Lots of Leaves Set was blended with Leaf Green Archival Ink and a strip Premium Double-Sided Tape 1/2" and placed diagonally on the box.  
  • Then adhesive Dots Micro were placed on the back of the flower, I placed on every other leaf and in the center. 
  • For the final touch, a butterfly was die-cut from decorative paper and a small epoxy dot was placed on the body.  The wings were then bent up and an Adhesive Dots Micro was placed under the body only and stuck down on the lid.

Materials Needed:

Scrapbook Adhesives by 3L®

Adhesive Dots Micro
3D Foam Squares White Mix

E-Z Dots

Home Hobby by 3L®

Premium Double-Sided Tape 1/2" Premium Double-Sided Tape 1/4" Plus Concord & 9th- Box Die Wendy Vecchi- Chippies Blossoms, Chippies Lots of Leaves, Leaf Green Archival Ink Stampendous- Spring Sparkle Embossing Powder Set, Sterling Silver Embossing Powder

DCWV- Decorative Paper

Queen & Co- Epoxy Dots

Rubbernecker Stamps- Small Butterflies Die Cut, Best Friends Etc Set