Featured Post

Privacy Policy

I'm working on a new privacy policy for my followers, but for now you should know that if you comment on my site, my site collects your ...

Wednesday, July 20, 2022

Christmas in July


Today I have a Christmas card made with stamps, stencils and dies from Rubbernecker Stamps. Here's how my card was made-

Place the Snowflake Stencil on a red cardstock panel and apply white pigment ink over the stencil. 


Now it's time to die-cut all of your pieces.  The Build an Owl Die was die-cut from a textured tan cardstock, white cardstock, black cardstock and peach cardstock.
Use the Owl Christmas Add On's Die to die-cut red and white glitter papers.
Die-cut white cardstock and white glitter paper using the largest die from the Nested Banner Stitch Die.


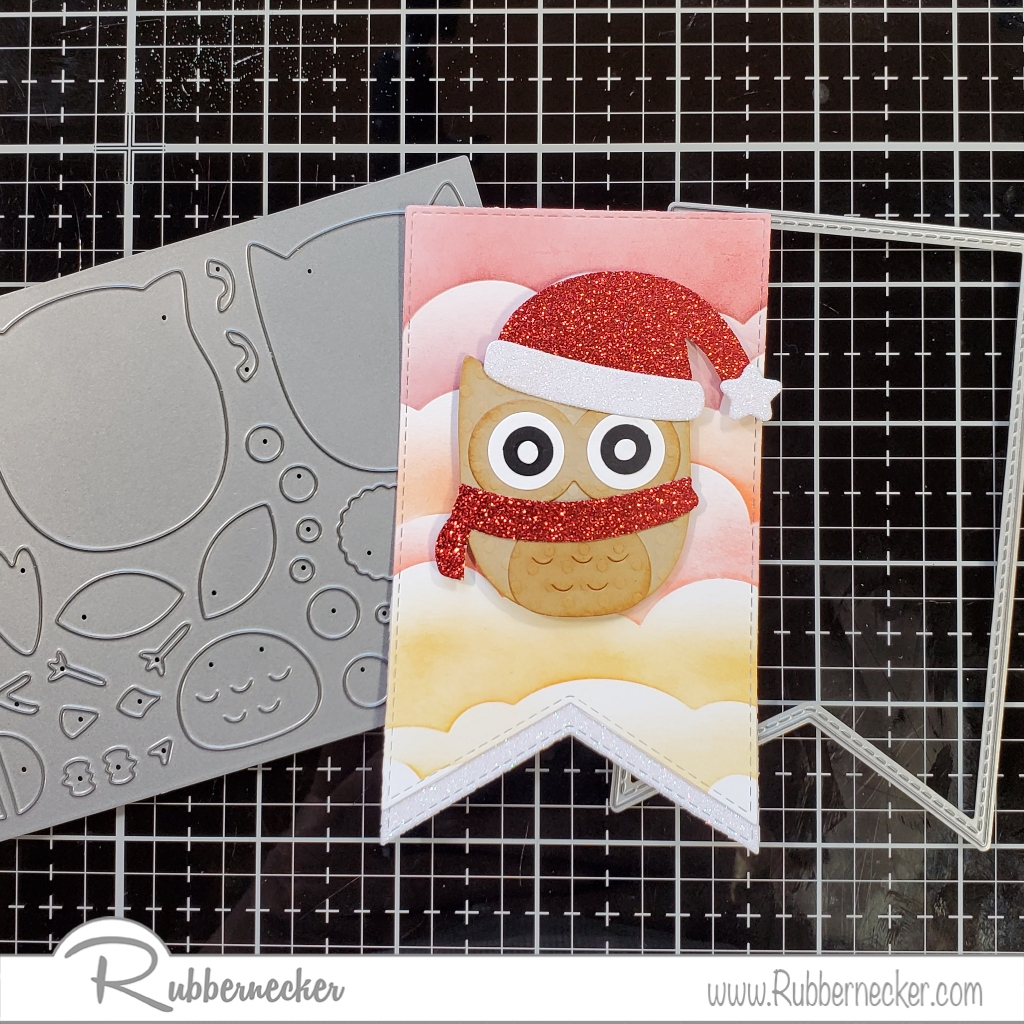
Now create your owl and set it aside.
Use the Clouds Stencil to make clouds on the banner using colors from Color Fuse Inks #1, #2, and #4.
Glue this onto the white glitter panel so the bottom can be seen on the banner.
Use foam squares to pop up the Santa owl on the cloud banner.
Glue the banner to the stenciled snowflake panel.
Stamp the sentiment with VersaMark Ink on a strip of red cardstock and emboss it with White Embossing Powder.
Die-cut this using the large Nested Banner Stitch Die and pop it up under the his feet using foam squares.
Glue the completed piece to a top folding white card and tie the top with white and gold twine.


Click on the items below to go to the Rubbernecker Stamps online shop.

Have a crafty day!

Let's Connect!

Affiliate and Product Disclosure
I am on various Design Teams and get free goodies for blogging about craft products but only because I love their products and genuinely use them. Ultimately my opinions are my own. A list of companies is in my sidebar.

Friday, July 15, 2022

Gift Tags with Tag Holders


Hi my friends, today I have these tags and matching tag holders up on the Scrapbook Adhesives by 3L Blog.


The tag holder was die-cut from decorative paper and Extreme Double-sided tape 1/8" was used to seal the seams.


A sun from the paper pack was cut out and Extreme Double-sided tape 1/8" was used to adhere it to a circle die cut from black cardstock.
For You was die-cut from gold glitter paper, layered onto black cardstock and popped up on the tag holder using 3D Foam Circles Black Mix.
A small butterfly was cut out from the paper pack and popped up on the right corner of the For You also using 3D Foam Circles.


This was then placed on a die-cut tag also using the Extreme Double-sided tape 1/8".
Black ribbon was added to the top of the tag and tied with gold cord.


This tag holder was made the same as above and to add a little bling.


Two strips of Extreme Double-sided Tape 1/8" and one of Extreme Double-sided Tape 1/4" were placed diagonally at the bottom right of the holder.  Gold Micro Glitter was sprinkled over the tape and rubbed in to insure adhesion.  Shake off any extra glitter and place it back into the bottle.


Materials Needed:

Scrapbook Adhesives by 3L® 3D Foam Squares Black Mix

Home Hobby by 3L® Extreme Double-sided Tape 1/8" Extreme Double-sided Tape 1/4"

Plus Sizzix Tim Holtz & Stephanie Bernard Collections- Dies Printworks Specialty Paper- Gold Glitter Paper, Black Cardstock Recollections- Decorative Paper

Have a crafty day!

Let's Connect!

Affiliate and Product Disclosure
I am on various Design Teams and get free goodies for blogging about craft products but only because I love
their products and genuinely use them. Ultimately my opinions are my own. A list of companies is in my sidebar.


Wednesday, July 6, 2022

Be Merry Wreath


Hi crafty friends, have you started thinking about your Christmas cards?  No, it's not too early to start, I have a Christmas card that is easy to mass-produce. Rubbernecker Stamps is having Christmas in July to help you begin your cards so they'll be ready in time to send out.  

My card is up on the Rubbernecker Blog with a tutorial you'll want to check out! Below is a list of Rubbernecker Stamps products used, just click on the image to go to their online shop.

Have a creative day! 


Let's Connect!

Affiliate and Product Disclosure
I am on various Design Teams and get free goodies for blogging about craft products but only because I love their products and genuinely use them. Ultimately my opinions are my own. A list of companies is in my sidebar.

Friday, July 1, 2022

Hello, Hello, Hello Mini Slimline Card


Happy July my crafty friends!  To start off the month, I have this mini slimline card up on the Scrapbook Adhesives by 3L Blog.


An Adhesive Sheet was placed on a white cardstock panel and Hello was die-cut three times.


Peel off the top paper liner from the words and apply gold Transfer Foil.


Do the same with both pink and blue Transfer Foil.


Use 3D Foam Micro Squares on the back of the gold foil Hello to pop it up. 
The other two were glued flat using the Dual Tip Glue Pen.


Use a mini slimline die to die-cut decorative paper, use the Dual Tip Glue Pen to adhere this to a slightly larger white panel and then onto a pink card.
A small butterfly was die-cut from gold glitter paper and glued to the top right of the card and a self-adhesive gem was added to the body.


Materials Needed:

Scrapbook Adhesives by 3L®

Metallic Transfer Foil Sheets Pastel Colors

3D Foam Micro Squares

Home Hobby by 3L® Dual Tip Glue Pen

Plus from Rubbernecker Stamps (click on the image to go to the Rubbernecker Stamps online shop).