Featured Post

Privacy Policy

I'm working on a new privacy policy for my followers, but for now you should know that if you comment on my site, my site collects your ...

Showing posts with label Foil. Show all posts

Thursday, September 15, 2022

Hello Thinking of You Card


To make the panel, shades of yellow and pink inks were blended on white cardstock, then attached to a black card using the Double-Sided Tape Runner Strips 150ft.


The flower was stamped on watercolor paper and colored with colored pencils.  It was then die-cut with a rectangle stitched die and layered onto a purple die-cut panel also using the Double-Sided Tape Runner Strips 150ft.


The panel was then popped up using 3D Foam Circles and mounted diagonally on the card.


Butterflies were die-cut from foam from the 3D Foam Creative Embellishment Kit.


A butterfly was added to the top right corner, blue foil from the Foil Transfer Sheets Pastel Colors pack was placed on top and a little rhinestone was added to the body. 
E-Z Runner Stars was used to place three stars at the bottom left of the card and crystal glitter was rubbed on top.


Skill Level: Intermediate

Creative Time: 35 minutes

Materials Needed:
Scrapbook Adhesives by 3L®
3D Foam Circles
3D Foam Creative Embellishment Kit
E-Z Runner Stars
Metallic Transfer Foil Pastel Colors

Home Hobby by 3L®
Double-Sided Tape Runner Strips 150ft

Plus
Rubbernecker Stamps- Stamps and Dies
Ranger Ink- Distress Inks


Monday, August 15, 2022

Fall Leaves Thinking of You


Happy Monday! Today I have a Fall Thinking of You card made with the help of different types of adhesives from Scrapbook Adhesives by 3L.  

Place an Adhesive Sheet 4" x 6" on white cardstock keeping the top liner of the Adhesive Sheet on.  Pull up the liner a bit and place black leaf stickers on the Adhesive Sheet, cut off that section and replace the liner so you can use the rest later.


I had some burlap wired ribbon that I cut a piece off, cut the wires off and placed a strip of Extreme Double-Sided Tape 1" on the back and adhered it to a tan panel that has been stamped with a dot background with brown ink.  


You aren't able to see the adhesive through the burlap.


3D Foam Strips were placed on the back of the panel, you want to use enough of the 3D Foam Strips on the back so that you don't have the edges or middle sagging.


Making the leaves was so much fun! I used different techniques for them, some leaves were made by rubbing a Foil Transfer Sheet on the leaf, and some were made with the foil marbling technique which is where you crumble up some foil, and place it on the leaf. When you remove the sheet, the foil that will be left on the leaf will look like veins. You will then sprinkle it with crystal glitter. Others only had glitter placed on them.
The leaves were mounted on the burlap ribbon using E-Z Runner Squares.


The sentiment was stamped on the bottom of the card with black ink, then black glitter washi tape was added to the top and the bottom of the burlap. This panel was then mounted to a black card using the E-Z Runner Squares.

Materials Needed:

Scrapbook Adhesives by 3L® Adhesive Sheets 4"x6" Metallic Transfer Foil Sheets Natural Colors Metallic Transfer Foil Sheets Pastels E-Z Runner Squares

Home Hobby by 3L® Premium Double-Sided Tape 1"


 Plus 
Stampendous- Glitter
Rubbernecker Stamps- Sentiment & Background Stamp
Krazy Kreations- Leaf Stickers

Have a crafty day!

Let's Connect!

Affiliate and Product Disclosure
I am on various Design Teams and get free goodies for blogging about craft products but only because I love their products and genuinely use them. Ultimately my opinions are my own. A list of companies is in my sidebar.

Sunday, May 15, 2022

Fun With Foil Slimline Card


Hi my crafty friends, I have this card up on the Scrapbook Adhesives by 3L Blog today with different ways you can use their Adhesive Sheets and Foil.  

  • Place a sheet of 4x6 in Adhesive Sheet on white cardstock, keep the top liner on, and die-cut with heart dies.
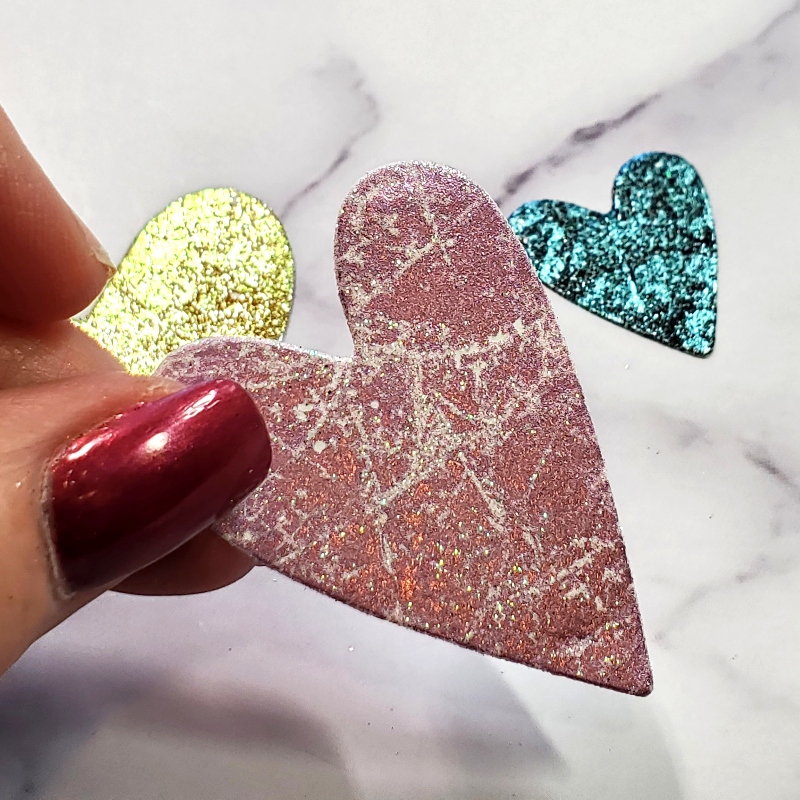
  • Cut foil a little larger than the heart that you are going to cover, then wad it up and roll it in your hands then open it, this is what you'll get.


  • Remove the liner from the heart and place the foil on top with the pretty side of the foil facing up.  
  • Remove the foil to reveal a marbled look which will be sticky so either a different color foil needs to be placed on it and rubbed to fill in the cracks or you can use glitter, fun flock or even embossing powder.


  • Here are three hearts that have just solid foil on top, they're beautiful!


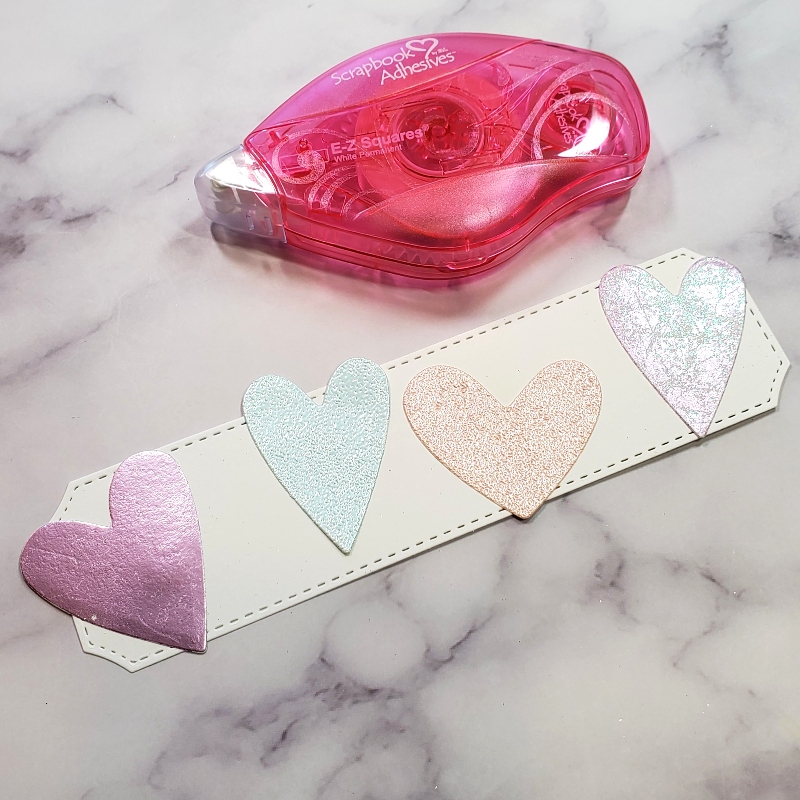
  • White cardstock was die-cut using a slimline die and four hearts were placed spaced apart using and glued flat using a E-Z Runner.  
  • The first heart uses solid pink foil, the blue and pink hearts are embossed with embossing powder and the last heart uses pink foil and the marbling technique.


  • Three hearts will be popped up using 3D Foam Circles and placed in between the hearts on the panel.


  • An additional blue heart was attached flat below the little green popped-up heart.
  • Die-cut a second larger panel from the same slimline die set and pop up the heart panel using 3D Foam Circles.
  • The words were stamped on white cardstock with black ink, cut them out and use the E-Z Runner to attach them flat to the bottom panel.
  • Pop up the panel to a slightly larger pink panel that has been stamped with splatter spots with pink ink.
  • Attach this to a white slimline card.
  • For the final touches, a few pink enamel dots were placed around the hearts and pink Enamel Accents were added to the larger white panel.


Materials used from Scrapbook Adhesives by 3L®

3D Foam Circles White Mix Adhesive Sheets 4x6" Metallic Transfer Foil Sheets Pastel Colors

Plus Stampendous- Word Stamps Whimsy Stamps- Slimline Dies Queen & Co- Enamel Dots


Sunday, August 15, 2021

Hello My Bestie


Hello and welcome back, today I have this foil butterfly card up on the Scrapbook Adhesives by 3L Blog with a full tutorial.  Head on over there to find out how to add foil and other embellishments using their fun products.

 Products used from Rubbernecker Stamps

Have a crafty day!

Let's Connect!

Affiliate and Product Disclosure
I am on various Design Teams and get free goodies for blogging about craft products but only because I love their products and genuinely use them. Ultimately my opinions are my own. A list of companies is in my sidebar.

Thursday, April 15, 2021

Happy Anniversary


Hi,  today I have an Anniversary card up on the Scrapbook Adhesives by 3L Blog, made using the pretty shimmery and sparkly Metallic Transfer Foil Sheets Holographic Colors, Adhesive Sheets 12" x 12", 3D Foam Butterflies, Adhesive Lines, 3D Foam Circles and the Dual Tip Glue Pen. Be sure to stop by their Blog for full directions and pictures on how to make this card, click HERE.


Have a creative day!

Let's connect!


Connect with Scrapbook Adhesives by 3L


Saturday, April 26, 2008

Foil Father's Day

This card was made for the SCS Inspiration Challenge and it was a safari theme. So here is what I did.
1. Cut a square of sticker paper, remove the backing and lay sticky side up on the desk. Take a piece of gold foil, crumple it up real well, open it back up and lay it down on the sticker paper with the shiny side up. Rub it down and remove.
2. The foil has a crackled look to it with some of the sticker paper exposed. Using a fluffy brush, brush russet Pearl Ex over the paper to completely cover and wipe off with a paper towel and you are left with a beautiful background!
3. Ink lion (Stampendous) with black StazOn ink and stamp onto foiled paper.
4. Layer onto black and gold papers and mount to a rust card.
5. Add stickers and feathers as shown.

Friday, April 18, 2008

Foil and Glitter Technique

Here is a card I made awhile ago, but it is one of my favorites and I'm sad to say this stamp by Stampendous is discontinued. I used a really great foil and glitter technique on the fish. What I did was
1. Stamp the fish on acetate with black StazOn ink then applied a piece of Peel N Stick to the back of the stamped image, leave the paper carrier on the exposed side.
2. Place the piece on a light box stamped side down and using an exacto knife cut out the fish on the carrier being careful not to cut threw the acetate.
3. Remove the carrier from the fish, leaving the paper on the surrounding area.
4. Apply variegated gold leaf to the fish and burnish with a kool tool (this looks like a little brillo pad on a stick) until no loose pieces are left.
5. When all of the excess gold leaf has been removed, peel off the remaining carrier and sprinkle with blue glitter, rub and remove excess.
6. Cut out stamped image from the acetate, layer onto tan and black papers.
7. Randomly stamp the branch on a tan panel with copper Brilliance. Layer onto a black card then glue on fish image as shown.
8. Stamp "happy birthday" on tan paper, cut out and mount to card as shown.
Have a great weekend!


Thursday, January 17, 2008

Enjoy


Wow is it windy here in So. California! Our power went out at least twice last night, luckily my husbands alarm has a battery back up so he and the kids got up on time. So today I have decided to stay in side except for one little trip to go pick up my new Stamp In Up catalogue :)

I used a really great technique to make this card. It is quick, easy and looks beautiful! I made the background that I stamped the flowers on, the technique doesn't have a name, I'm open for suggestions :)
1. Cut a piece of sticker paper to the correct size and remove the carrier (the paper covering the sticky part).
2. Take a piece of gold foil (can be purchased at craft stores), crumple it up real good, then open it and lay it on top of the sticky side of the sticker paper with the non-shiny part of the foil down. The foil is on a plastic liner, so after you rub the foil, pull the plastic liner up and off of the sticker paper.
3. The foil will look like marble . So now with a fluffy brush, lightly brush on pink Pearl Ex (also found at craft stores), making sure it completely covers the sticker paper. Wipe off the excess powder with a paper towel and you are done. This makes beautiful background papers and you can try this with all different colors!
4. Stamp you image with black StazOn ink and let dry.
Recipe
Stamps-Stampendous
Inks-black StazOn, VersaMark
Paper-sticker paper, pink and black card stock
Plus-Pearl Ex, gold foil, white embossing powder, white ribbon, gold brad, medium hole punch