Featured Post

Privacy Policy

I'm working on a new privacy policy for my followers, but for now you should know that if you comment on my site, my site collects your ...

Thursday, January 24, 2019

Just Best Friends


With Valentine's Day coming up, I thought it would be nice to make a Valentine's Day card for a friend.  Who wouldn't be happy pulling out a card to see Epstein looking at you with those big eyes?!  He's stamped on watercolor paper and colored with Zig Clean Color Real Brush Pens.
White cardstock was die cut with the Nested Circle Stitched Die Cut Set and layered onto pink decorative paper die cut with the Nested Circle Scallop With Holes Die.
The sentiment from the Best Friends Etc Clear Set was stamped on a strip of black paper with VersaMark Ink, embossed with white embossing powder.  A heart was die cut with the Heart Outline Stitch and slipped over the black strip before being glued down.

Follow Me- Stamp This
Twitter

Affiliate and Product Disclosure
I am on various Design Teams and get free goodies for blogging about craft products but only because I love their products and genuinely use them. Ultimately my opinions are my own. See the sidebar for a list of companies.
I am part of various affiliate programs – when you click on an affiliate link and then go on to make a purchase, at no cost to you, I receive a small commission.  The affiliates I use include Rubbernecker Stamps and Whimsy Stamps.


Wednesday, January 23, 2019

Whimsy Wednesday- You're Darn Tootin'

                                                                                    
Happy Whimsy Wednesday!  I have another card using the Old Geezer Stamp Set and it's paired with the new Wonky Window 1 Die that has been stamped with the Buffalo Plaid Background Stamp in red.

The Old Geezer is colored with Prisma colored pencils and he's shadowed with blue decorative chalk.  And to make it just a little extra funny, I added glitter to the gas plume.

I hope you have a creative day!

     *NEW Old Geezer Clear Stamps  *NEW Wonky Window 1 Die *NEW Buffalo Plaid Background Rubber Cling Stamp Versafine Full-Size Ink Pad - Onyx Black Sparkletz - Peppermint Jazz
                                                                                                                      
Follow me, Stamp This


Affiliate and Product Disclosure
I am on various Design Teams and get free goodies for blogging about craft products but only because I love their products and genuinely use them. Ultimately my opinions are my own. A list of companies is in my sidebar.
I am also part of various affiliate programs – when you click on an affiliate link and then go on to make a purchase, at no cost to you, I receive a small commission.  The affiliates I use include Rubbernecker Stamps and Whimsy Stamps.
I hope if you like the content of my blog you will support me by clicking through these links to make your purchases.


Tuesday, January 22, 2019

Be Your Own Unique Self


Be your own unique self!!  My card today uses the new Dragon Wheel Q Set from Stampendous and there's a matching Die available, you can click on the product below to be taken to the website.

Here's how my card was made;

1.  Stamp Dragon on watercolor paper with black ink, color with Zig Clean Color Real Brush Markers and cut out.
2.  Use the Spring Borders Cutting Die Set to cut decorative paper and black paper, layer and glue to a white panel.  Glue a strip of decorative paper to the bottom, glue to a larger black panel and mount to a green card.
3.  Stamp sentiment on a white cardstock circle with black ink and glue to the upper right of the card.
4.  Pop up Dragon on the left side of the card.
The hearts are from one of the other borders in the set and glued randomly to the card.


Supplies
Stampendous
QS5016 Dragon Wheel
DCP1009 Spring Borders Cutting Die Set
VersaFine Onyx Black Ink

Plus
My Colors Cardstock- Grasshopper
Watercolor Paper
Beacon Adhesives-Zip Dry Glue
Scrapbook Adhesives by 3L- 3D Foam Squares
Prisma Colored Pencils
Dress My Craft- Decorative Paper


Disclaimer- I get free goodies for blogging about craft products! Today I'm sharing a card made with products from Stampendous.


Monday, January 21, 2019

Birthday Kids


I have fallen in love with the Birthday Kids Perfectly Clear Set, it is so cute with its sweet images.  I'm especially fond of it because I became a grandma yesterday to a wonderful baby girl!!!!  She is our first grandchild and I am looking forward to making her a bunch of birthday and holiday cards for her.  Now on to how my card was made;

1.  Stamp images from the Birthday Kids Perfectly Clear Set on watercolor paper with black ink and emboss with Clear Embossing Powder.  Color with Zig Markers and cut out.
2.  Use the Meadow Edgers Die Set to die cut white and kraft color cardstock and glue to a panel of decorative paper as shown.
3.  Glue presents to the bottom left of the card and pop up girl and balloons on the right side.
4.  Stamp sentiment from the set onto decorative paper, die cut using the Fitted Frames B Die Set and layer onto a larger kraft color frame.  Pop up on the card using foam squares.
5.  Tie the top of the card with twine.

Supplies
Stampendous
SSC1307 Birthday Kids
DCP1013 Meadow Edgers Die Set
DCP1006 Fitted Frames B Die Set
EP020 Clear Embossing Powder
STF082 Onyx Black VersFine Ink

Plus
My Colors Cardstock
Decorative Paper- The Paper Studio
Watercolor Paper- Strathmore
3D Foam Squares- Scrapbook Adhesives by 3L
Zip Dry Glue- Beacon Adhesives
3D Foam Squares- Scrapbook Adhesives
Zig Clean Color Real Brush Markers
Twine- Offray


Disclaimer- I get free goodies for blogging about craft products! Today I'm sharing a card made with products from Stampendous.


Wednesday, January 16, 2019

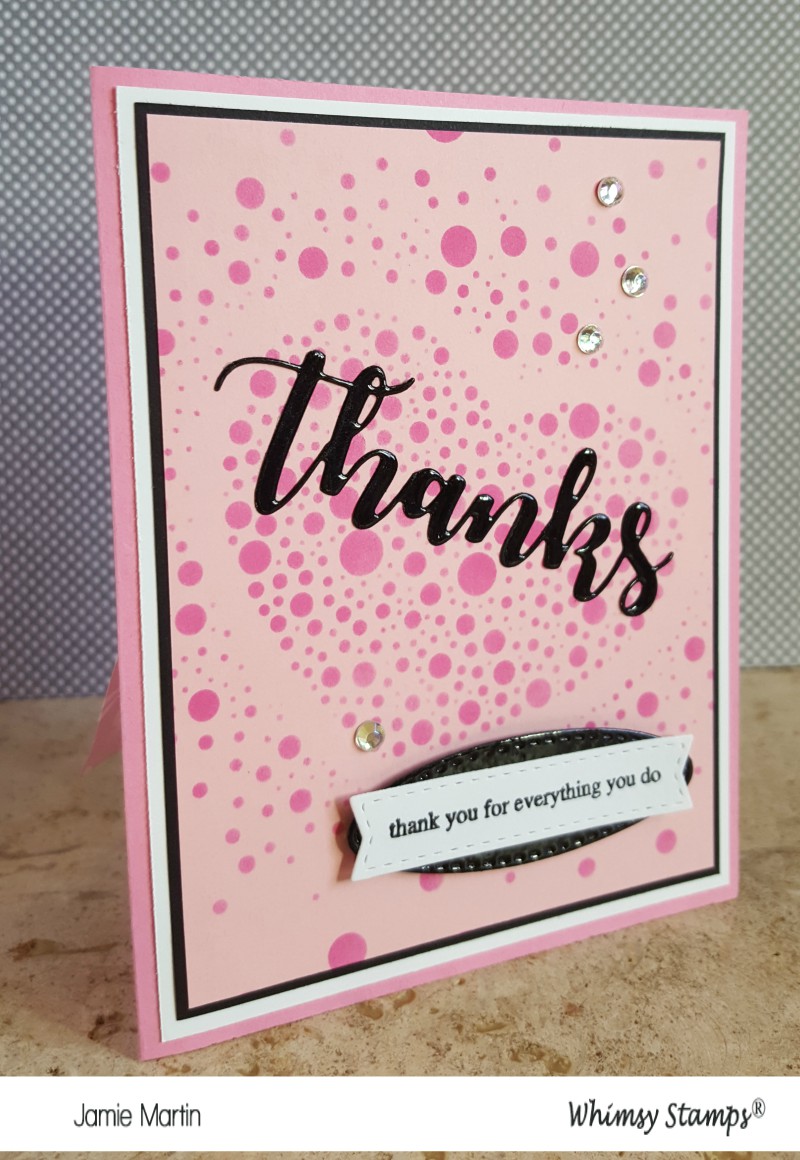
Whimsy Wednesday- Loving Thanks


Happy Whimsy Wednesday!  Today I have a thank you card that really has a lot going for it.  The Thanks is the Thanks Word and Shadow Die, cut from black cardstock then rubbed with VersaMark Ink and embossed with clear embossing powder, this gives it a shiny enamel look.  


The Thanks is glued to a pink panel that has been made by sponging pink ink over the Speckled Heart Stencil.
The sentiment is from the Mom's Layered Flowers Stamp Set, stamped on a piece of white cardstock, die cut with the Quick Strips Die Set.  It's then layered onto a black piece die cut from the same set, rubbed with VersaMark Ink and embossed with clear embossing powder.


          Mom's Layered FlowersVersaMark Full-Size Ink Pad - Original (Clear)                                                                             
                                                                                                                      

Follow me, Stamp This


Affiliate and Product Disclosure
I am on various Design Teams and get free goodies for blogging about craft products but only because I love their products and genuinely use them. Ultimately my opinions are my own. A list of companies is in my sidebar.
I am also part of various affiliate programs – when you click on an affiliate link and then go on to make a purchase, at no cost to you, I receive a small commission.  The affiliates I use include Rubbernecker Stamps and Whimsy Stamps.
I hope if you like the content of my blog you will support me by clicking through these links to make your purchases.


Tuesday, January 15, 2019

The Best Things In Life


Today I'm sharing a card made with new stamps from Stampendous and it's really making me look forward to spring and blooming flowers.  So far we've been lucky here in Oklahoma and have had a mild winter but it's still been cold.  Hope you're staying warm where you are!

Here's how my card was made;
1.  Stamp Delphinium on watercolor paper with black ink, emboss with Clear Embossing Powder and color with Zig Markers.
2.  Sponge the edges with Tea Dye Ink, layer onto a black panel and then layer diagonally onto a yellow panel.
3.  Glue to a kraft color card that has been stamped using the Taj Tile stamp with brown ink.
4.  Stamp sentiment from the Best Day Perfectly Clear Set, on a strip of kraft color cardstock with black ink and emboss with Clear Embossing Powder.  Layer onto a yellow strip and glue to card as shown.

Supplies
Stampendous
P328 Delphinium
6CR013 Taj Tile
SSC1309 Best Day Perfectly Clear Set
EP020 Clear Embossing Powder
STF082 Onyx Black VersFine Ink

Plus
My Colors Cardstock- My Minds Eye
Watercolor Paper- Strathmore
Zip Dry Glue- Beacon Adhesives
Zig Clean Color Real Brush Markers
Distress Ink- Tea Dye


Disclaimer- I get free goodies for blogging about craft products! Today I'm sharing a card made with products from Stampendous.

Saturday, January 12, 2019

Quick and Easy Thank You Card


I'm always in need of thank you cards and sometimes I need one last minute.  If you're like me and quickly need a thank you card, this might be a good one for you to make all you need is decorative paper and this Thanks Word and Shadow Die Set from Whimsy Stamps.  


This die comes with three pieces which can be all layered together or you can use one or two pieces, here I used two of the pieces.  It might be hard to tell from the picture but the decorative paper is cut diagonally with each side layer onto a thin strip of brown cardstock.

Product Link

*NEW Thanks Word and Shadow Die Set


Follow me, Stamp This


Affiliate and Product Disclosure
I am on various Design Teams and get free goodies for blogging about craft products but only because I love their products and genuinely use them. Ultimately my opinions are my own. A list of companies is in my sidebar.
I am also part of various affiliate programs – when you click on an affiliate link and then go on to make a purchase, at no cost to you, I receive a small commission.  The affiliates I use include Rubbernecker Stamps and Whimsy Stamps.