Featured Post

Privacy Policy

I'm working on a new privacy policy for my followers, but for now you should know that if you comment on my site, my site collects your ...

Showing posts with label Thinking of You. Show all posts

Thursday, September 15, 2022

Hello Thinking of You Card


To make the panel, shades of yellow and pink inks were blended on white cardstock, then attached to a black card using the Double-Sided Tape Runner Strips 150ft.


The flower was stamped on watercolor paper and colored with colored pencils.  It was then die-cut with a rectangle stitched die and layered onto a purple die-cut panel also using the Double-Sided Tape Runner Strips 150ft.


The panel was then popped up using 3D Foam Circles and mounted diagonally on the card.


Butterflies were die-cut from foam from the 3D Foam Creative Embellishment Kit.


A butterfly was added to the top right corner, blue foil from the Foil Transfer Sheets Pastel Colors pack was placed on top and a little rhinestone was added to the body. 
E-Z Runner Stars was used to place three stars at the bottom left of the card and crystal glitter was rubbed on top.


Skill Level: Intermediate

Creative Time: 35 minutes

Materials Needed:
Scrapbook Adhesives by 3L®
3D Foam Circles
3D Foam Creative Embellishment Kit
E-Z Runner Stars
Metallic Transfer Foil Pastel Colors

Home Hobby by 3L®
Double-Sided Tape Runner Strips 150ft

Plus
Rubbernecker Stamps- Stamps and Dies
Ranger Ink- Distress Inks


Tuesday, March 8, 2022

New Release-Rubbernecker Stamps


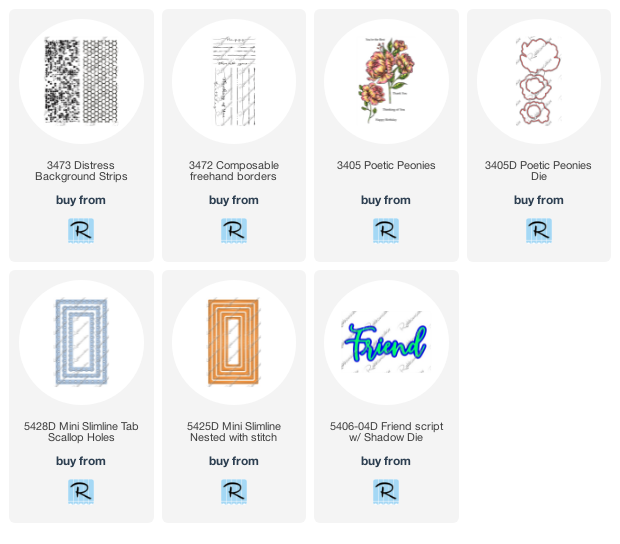
Today is New Release Day for Rubbernecker Stamps and I have a mini slimline card made with the new Distressed Background Strips and the Composable Freehand Borders Set.

To make my card, the flower and leaves from the Poetic Peonies Set were stamped on watercolor paper and colored with Zig Clean Color Real Brush Pens and die-cut with coordinating dies.
Die-cut "Friend" using the Friend Script w/ Shadow Die from black cardstock.


Stamp gray cardstock with VersaMark Ink and emboss with White Embossing Powder, then die-cut the stamped image with the Mini Slimline Nested w/ Stitch Die.


Use the Mini Slimline Scallop Holes Die to die-cut white cardstock.


Use a tape runner to attach the Mini Slimline Scallop Holes onto slightly larger pink cardstock.
Stamp the link and the sentiment from the Composable Freehand Borders Set with Onyx Black VersaFine Ink and pop up the embossed piece in between them.


Use a tape runner to attach the leaves to the left side of the card and pop up the flower with foam squares.
Place 3D Foam Squares Micro Black on the back half of "Friend" and place as shown.


Click on product to go to the Rubbernecker Stamps online shop.
Have a crafty day!

Let's Connect!

Affiliate and Product Disclosure
I am on various Design Teams and get free goodies for blogging about craft products but only because I love their products and genuinely use them. Ultimately my opinions are my own. A list of companies is in my sidebar.
Being part of various affiliate programs – when you click on an affiliate link and then go on to make a purchase, at no cost to you, I receive a small commission.  The affiliates I use include Rubbernecker Stamps.

Tuesday, November 9, 2021

Just For You


It's always nice to take a break from coloring images and Rubbernecker Stamps has a line of layered floral clear stamps that leave you with a beautiful and colorful image.  

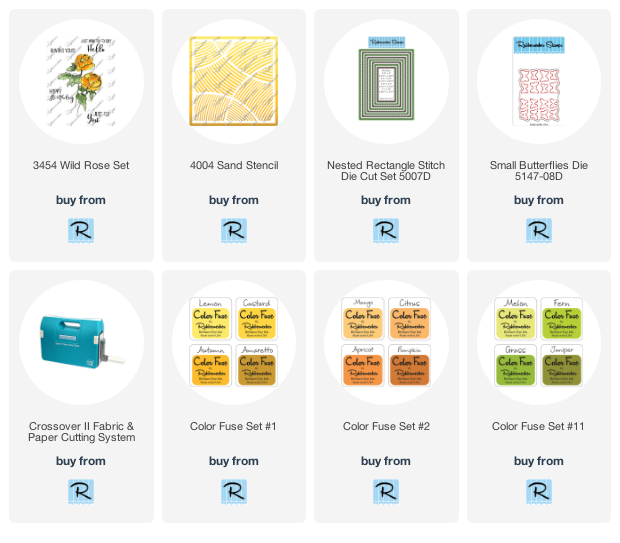
For my card, I used the Wild Rose Set and inked it with Color Fuse Inks from sets #1, #2 and #11.
The Sand Stencil was used to make a background panel with Color Fuse Inks from sets #1 and #2, the colors were blended with blender brushes but sponges work too.
To add a little dimension, the stamped image was layered on several panels and popped up with foam squares.  A butterfly was die-cut using the Small Butterflies Die and this too was popped up.

Click on the images below to be taken to the Rubbernecker Stamps online shop.


Have a crafty day!

Let's Connect!

Affiliate and Product Disclosure
I am on various Design Teams and get free goodies for blogging about craft products but only because I love their products and genuinely use them. Ultimately my opinions are my own. A list of companies is in my sidebar.
Being part of various affiliate programs – when you click on an affiliate link and then go on to make a purchase, at no cost to you, I receive a small commission.  The affiliates I use include Rubbernecker Stamps.

Friday, July 10, 2020

Lucky Stars


Hi my crafty friends, today is the Mini Release day for Soul Sisters from Whimsy Stamps.  Covid quarantine have you missing your girl time?  Show your friends that you care with this sweet new release.

To make my card I stamped the images on watercolor paper with Onyx Black VersaFine Ink and then colored with Inktense Pencils.  The matching dies make is quick and easy to cut out the images.  Peekaboo Window 3 Die was used for the background along with the pretty 6" x 6" Paper Pack- Calico, I just love the decorative paper!


Be sure to stop by the Whimsy Stamps site to see what other new products they've released today.

**NEW Soul Sisters Clear Stamps - Whimsy Stamps  **NEW Soul Sisters Outline Die Set - Whimsy Stamps  Peekaboo Window 3 Die - Whimsy Stamps  **NEW 6x6 Paper Pack - Calico - Whimsy Stamps

Have a creative day and follow me on 

Instagram

Affiliate and Product Disclosure
I am on various Design Teams and get free goodies for blogging about craft products but only because I love their products and genuinely use them. Ultimately my opinions are my own. A list of companies is in my sidebar.
Being part of various affiliate programs – when you click on an affiliate link and then go on to make a purchase, at no cost to you, I receive a small commission.  The affiliates I use include Whimsy Stamps.


Thursday, May 2, 2019

Thinking of You- Rubbernecker Stamps


Hi my crafty friends, I'm up on the Rubbernecker blog today with this Thinking of You card.  if you've been with me for a while you know I like to make pretty cards that are quick and easy because so many of us are busy and don't always have an hour to color an image.  I won't say it's a 5 minute card but it's probably a 10 minute card!  Image how pretty these would be in different colors, it would make a wonderful gift set for any occasion!


Here's how it's made;
1.  Place the Circle Lattice Die-Cut Set on the left side of a white cardstock panel and run it through your die-cut machine.
2.  Stamp the vines from the Organic Set #2, on the left side with VersaFine Clair Ink in Verdant.  You'll do this two times, don't worry about it overlapping, the sentiment will cover it.
3.  Glue this to a larger periwinkle panel then pop it up on a white card.
4.  Die-cut a white rectangle using the Nested Rectangle Stictch Die-Cut Set and stamp the vines on the two sides with the Verdant ink.  Heat set, rub with an embossing buddy or it you don't have one you can use baby powder.  Stamp the sentiment with Onyx Black VersaMark Ink and emboss with clear embossing powder.  Layer onto black paper and pop up on the card.
5.  Stamp the butterfly with black ink, emboss with clear and cut out.  Bend the wings and glue only the body to the card so the wings will stand up.
6.  Randomly apply rhinestones and you're done!

Click on the poduct  image to go to the Rubbernecker Stamps website
   
Follow Me- Stamp This, on-
Twitter

Affiliate and Product Disclosure
I am on various Design Teams and get free goodies for blogging about craft products but only because I love their products and genuinely use them. Ultimately my opinions are my own. A list of companies is in my sidebar.
Being part of various affiliate programs – when you click on an affiliate link and then go on to make a purchase, at no cost to you, I receive a small commission.  The affiliates I use include Rubbernecker Stamps and Whimsy Stamps.


Sunday, October 29, 2017

Thinking of You


It's Sweet Sunday Team Inspiration day at Rubbernecker Stamps and I have a card made with the Fall Foliage two part set but I only used the tree.  To make the background, I rubbed ink pads on a long thin acrylic block in Mowed Lawn, Marigold and Straw.  The block was then sprayed with water and the ink was stamped on a white panel.  Once dry the trees were stamped with VersaMark ink and embossed with Twilight embossing powder.  Thinking of You was stamped on a white tag, embossed with Twilight.  It was then stamped with one of the small stamps from the Splatter Stains sets in Marigold and Straw, layered on black, tied with ribbon and popped up on the card.

Now head on over to the Rubbernecker Blog and see what the other designers have for you!

Stay connected and don't miss a thing!

 Follow Stamp This 


Disclaimer- I get free goodies for blogging about craft products!  Today I'm sharing some fun new products sent to me from Rubbernecker Stamps.


Wednesday, April 26, 2017

Sweet Pea Bouquet


Card sample using R289

It's April Showers week at Stampendous and boy have we been having showers in Oklahoma with quite a bit of street flooding.  But with those showers, it brings flowers!  I'm sharing a card made with the Sweet Pea Bouquet and with Mother's Day coming up, you could change out the sentiment to make a wonderful Mother's Day card.  Disclaimer- You guys know I get free goodies for blogging about craft products!  Today I'm sharing some fun new products sent to me from Stampendous, My Mind's Eye and Beacon Adhesives!

Here is how my card was made;
1.  Stamp Sweet Pea Bouquet on a white panel with black ink.
2.  Color with colored pencils and watercolor pencils.
3.  Sponge the edges with blue ink.
4.  Stamp saying with black ink and use Fitted Frames to die cut it and a larger green frame.  Pop up at the bottom corner of the card.

Supplies
Stampendous
R289 Sweet Pea Bouquet
SSC1141 Friendly Phrases
DCP1005 Fitted Frames A
Pink Dot Sparklers
MPW811 Mixed Media White Paper
STF082 Onyx Black VersaFine Ink

Plus
My Colors Cardstock
Zip Dry Glue
watercolor pencils
Prisma Colored Pencils
3D Foam Squares Beacon Adhesives by 3L

Here are the other Stampendous Design Team Members who are sharing cards today.

Stampendous Blog

Jamie Martin (that's me!)

Kristine Reynolds


Stay connected and don't miss a thing!

 Follow Stamp This 
(I follow crafty people back!)


https://blogger.googleusercontent.com/img/b/R29vZ2xl/AVvXsEiBIB7cl3FWcUqRpVNE2xf0uD7bSSaDv8EJChhD3TSJRrDTTqubuFddCha_Vsye2BIOBKX1yGUjGJyPJvjizD-izRFYxEG1Q0kTmLKEiANGSeoreVxGdz2kjJCF6lGrlm9fopxLmRzM6V04/s1600/Stampendous+logo.jpg


Wednesday, June 29, 2016

Create Sunshine


This week I'm sharing the rest of the floral cards I made for the Stampendous April catalog before it's time to reveal the new projects from the July catalog starting July 5th. 

Here is how my card was made;

1.  Stamp Create Sunshine on a white panel with black ink and color with pencils.
2.  Layer onto a Cafe Ole panel and set aside.
3.  Stencil Cathedral Window Large onto a Lilac Mist card with Wilted Violet ink.
4.  Layer Create Sunshine diagonally onto a Tuscon Sun panel and glue to card.

Supplies
Stampendous
P286 Create Sunshine
MPW811 Mixed Media White Paper
DWLJ808 Cathedral Window Large
DWNHB-12 1/2" Brush Natural Handle
MEM01 Tuxedo Black Memento Ink

Plus
My Colors- Lilac Mist, Tuscon Sun, Cafe Ole
Prisma colored Pencils
Distress Ink- Wilted Violet
Zip Dry Glue

Stay connected and don't miss a thing!


Monday, May 16, 2016

To Cheer You


I love this To Cheer You stamp from Stampendous, it's one big stamp so the layout of your card is done for you! Here is how I made the card;

1.  Stamp image twice on white cardstock with black ink and color two of the butterflies from one sheet with pencils and cut out. Color all of the butterflies on the second sheet.
2.  Now it's time to dust off those chalks you got years ago, using them for the background is quick and easy.  All you have to do is use  a flat brush, apply blue chalks around the butterflies.  I never use a sealer and don't have any problem with it rubbing off.
3.  Bend the wings of the two cut out butterflies and glue onto the colored panel, gluing only the bodies down not the wings.
4. Color the dots white using a white Uniball Signo pen.
5.  Layer onto Plum paper, then onto a Caribbean Sea card.


Supplies
Stampendous
R254 Cheer You
DCP1005 Fitted Frames A
MPW811 Mixed Media White Paper
MEM01 Onyx Black VersaFine Ink

Plus
My Colors paper
Prisma Pencils
White Uniball Signo Pen
Chalks

Stay connected and don't miss a thing!


Tuesday, June 10, 2014

Stampendous and Core'dinations All Week!

2014_06_coredinations

Welcome to another week long collaboration! This week we're playing with Core'dinations' gorgeous papers! They always make a project pop with the addition of so much texture! Plus, they're just plain yummy colors! We love the way you can sand the papers to allow the coordinating color core show through. This card from our own Kristine Reynolds really highlights this fantastic technique. This works with embossing folders, metal dies (like those from our friends at Dreamweaver Stencils), or just sanding straight on the paper to create a distressed look.Sleepy Reader by Kristine Reynolds (House-Mouse Designs® Gruffies® by Ellen Jareckie)[/caption]   Of course there are prizes this week! Three prize packages will be awarded. Package includes the Lovely Garden Stamp Set; the Matching Lovely Garden Cutting Dies; a Sand It Kit from Core'dinations which includes a sanding block, replacement sandpaper, and a "must-have" Dust Buddy clean up cloth; Core'dinations will also be sending the lucky winners some of their fantastic 6" X 6" paper pads. PLUS an extra special bonus - our friends at Dreamweaver Stencil will be adding the gorgeous Stone Wall stencil that Jamie Martin used in her terrific card she'll be posting this week (you can see a peek of it on the blog banner!) LET'S GET STARTED! The official rules are HERE. You still need a U.S. mailing address to win, but we sure want to hear your comments anyway! We'll draw three random blog posts from all the posts this week. Then we'll choose one comment from each. Of course we'll love you even more if you pin our projects to your Pinterest Boards or if you Tweet, or Share on Facebook, follow us, like our pages. You know the drill!


1.  Emboss Dreamweaver Stencils LG611 on Core'dinations The Chocolate Box paper by running it through your Big Shot using the embossing mat.
2.  Use Core'dinations paper sander and sand the to of the paper to reveal the core color. Layer it onto yellow Core'dinations paper, mount piece to teal paper from the Spotted collection and set aside.
3.  Stamp small flower from Cling Jumbo Lovely Garden set three times, leaf one time and the butterfly once on white cardstock with Onyx Black VersaFine ink and heat set.
4.  Color flowers using Radiant Neon ink in Electric Orange, Electric Yellow and Electric Green using Inkblusher sponges.  To add shadows use Q-tips to place color exactly where you want it.  Do the same to the leaf using Electric Green.
5.  Color the butterfly with watercolor pencils.
6.  Cut out all of the pieces using the Lovely Garden Die Cut Set from Stampendous by placing them over the image, tape down using REMOVABLE tape and run it through your Big Shot.
7.  Mount flowers to the the top corner of your card using Beacon Adhesive 3 in 1 glue and Scrapbook Adhesives by 3L 3D Foam Squares and glue the butterfly after bending the wings up (don't glue down the wings).
8.  Stamp sentiment from the Say It Today set using Onyx Black on cream paper.  Layer onto a strip of cardstock that has been rubbed with Versamark ink, sprinkled with Aged Teal Embossing Enamel and heated from the bottom so the chunky powder doesn't blow off.  Mount to the card using 3D Foam Squares.

  Here's who is posting today!

Core Blog

Tenia Nelson

Jennifer Edwards

Lea Kimmel

Ava Gavloski

Jamie Martin

Suzanna Lee

Krissy Fossmeyer

Kristine Reynolds

  ***Blog Hop Hint - if you click on a link that takes you to a page saying something like, "Sorry this page cannot be found," just click on the header at the top of the blog (usually a picture, or the blog's name), and it will take you to that blog's most recent post. That post *should* be our hop. If not, you can probably scroll down a short way to find the hop post. When in doubt type Stampendous in the search box to find the most recent post about our products.

Stay connected
Follow my blog (in the right column)
Follow me on Twitter
Follow me on Instagram- stampthis


https://blogger.googleusercontent.com/img/b/R29vZ2xl/AVvXsEiBIB7cl3FWcUqRpVNE2xf0uD7bSSaDv8EJChhD3TSJRrDTTqubuFddCha_Vsye2BIOBKX1yGUjGJyPJvjizD-izRFYxEG1Q0kTmLKEiANGSeoreVxGdz2kjJCF6lGrlm9fopxLmRzM6V04/s1600/Stampendous+logo.jpg

Thursday, May 1, 2014

Flowers and Stencils


Hi and welcome to my first post as a member of the Dreamweaver Stencils Dream Team!!!! I am so excited to be a part of this great company and to show you what you can do with stencils, so sit back with a tasty beverage and  here we go!

1.  Rub back of  LL549 Tall Daisies stencil with Dreamweaver Handmade Hawaiian Soap (so it will release from the sticky paper) and place on MPDS Double-sided Mounting Paper (this paper is sticky).


2.  Cut a straw in half diagonally to use as a sharp little spoon, this will be easier to get into the small areas and scoop yellow Micro Glitter, place in the center of the flowers and do the same with lavender, purple and lime glitters being careful to get glitters only where you want them.


3.  Turn upside down (over a trash can), tap on the back and remove stencil from sticker paper while still upside down.
4.  Now sprinkle the entire piece with multi glitter, rub and shake off the excess.
5.  Place LX7001 Tapestry stencil on purple paper and paste emboss with Dreamweaver Embossing Paste in Glossy Black. Remove stencil, let dry.
6.  Tie flower piece with sheer ribbon and attach as shown then quickly heat with a heat gun so it curls.
7.  Place  LG704 Birthday Words stencil on paper, spread with glossy black paste, remove and let dry.
8.  Punch the corners, sponge with purple ink, layer onto black and add Dot Sparklers in the corners then mount to card using foam tape.


Other Supplies
Stampendous-Micro Glitter in lime, purple, lavender, sunflower. Multi Ultra Fine Glittter and Dot Sparklers .
Random items-Green sheer ribbon, corner punch


Please welcome our new "A" team, officially posting for the first time!


Stay connected
Follow my blog (in the right column)
Follow me on Twitter
Follow me on Instagram- stampthis


https://blogger.googleusercontent.com/img/b/R29vZ2xl/AVvXsEh51wyTO6jT5VTdYnB6w_G_m5HpVcLHg74CtPgP_LxPEKzn_V-OoKqGG2xT1wqb9akJ4WnFtjyWN2v_w0oXJVDqSV3SyVI_lnvmji1y88Z-8_yaN4exn-xXopYtjiwAjsF2De1Y9Uh9R-yQ/s1600/Dreamweaver+logo.jpg

Add your link here