Featured Post

Privacy Policy

I'm working on a new privacy policy for my followers, but for now you should know that if you comment on my site, my site collects your ...

Showing posts with label Whimsy Stamps. Show all posts

Monday, May 1, 2023

Be A Cactus Card


Today I have a fun cactus card with a southwestern flare and it's up on the Scrapbook Adhesives by 3L Blog.

Die-cut white cardstock and decorative paper using the largest rectangle die from the set. Using a paper trimmer, cut just a bit of the top left corner off and about half of the bottom right corner off.


Using the E-Z Runner Squares Dispenser, tape the cut white cardstock panel to the decorative paper panel and set aside.


Die-cut white cardstock using the second to the smallest oval and apply green and blue inks using blender brushes.


Stamp the cactus images on white cardstock, color with colored pencils then die-cut the images. Next, apply Sunflower Liquid Pearls to the dots on the tall cactus. Since the dots are so small, I squirted some of the Liquid Pearls on my glass mat and used a small stylus to dip it into the Liquid Pearls and dot it on the vase.

E-Z Runner Squares were placed on the back of the tall cactus 3D Foam Circles were place behind the flower cactus and mounted to the oval as shown.


3D Foam Strips were placed on the back of the oval panel. These are great to use so that no part of your oval sags once it's placed on the card.


The oval is placed off center to the upper left. Two die-cut arrows were glued below the cactus's using the Dual Tip Glue Pen. The sentiment was stamped with brown ink on white cardstock, layered on brown cardstock and popped up on the bottom of the card using 3D Foam Circles. Orange enamel dots were randomly placed around the card.


off


Supplies

All adhesives are from Scrapbook Adhesives by 3L

Stamps, Dies and Decorative Paper- Whimsy Stamps
Arrow Dies- Spellbinders
Inks- Pinkfresh
Liquid Pearls- Wendy Vecchi/ Ranger
Cardstock- PrintWorks Specialty Paper

Have a crafty day!

Let's Connect!

Affiliate and Product Disclosure
I am on various Design Teams and get free goodies for blogging about craft products but only because I love their products and genuinely use them. Ultimately my opinions are my own. A list of companies is in my sidebar.

Sunday, May 15, 2022

Fun With Foil Slimline Card


Hi my crafty friends, I have this card up on the Scrapbook Adhesives by 3L Blog today with different ways you can use their Adhesive Sheets and Foil.  

  • Place a sheet of 4x6 in Adhesive Sheet on white cardstock, keep the top liner on, and die-cut with heart dies.
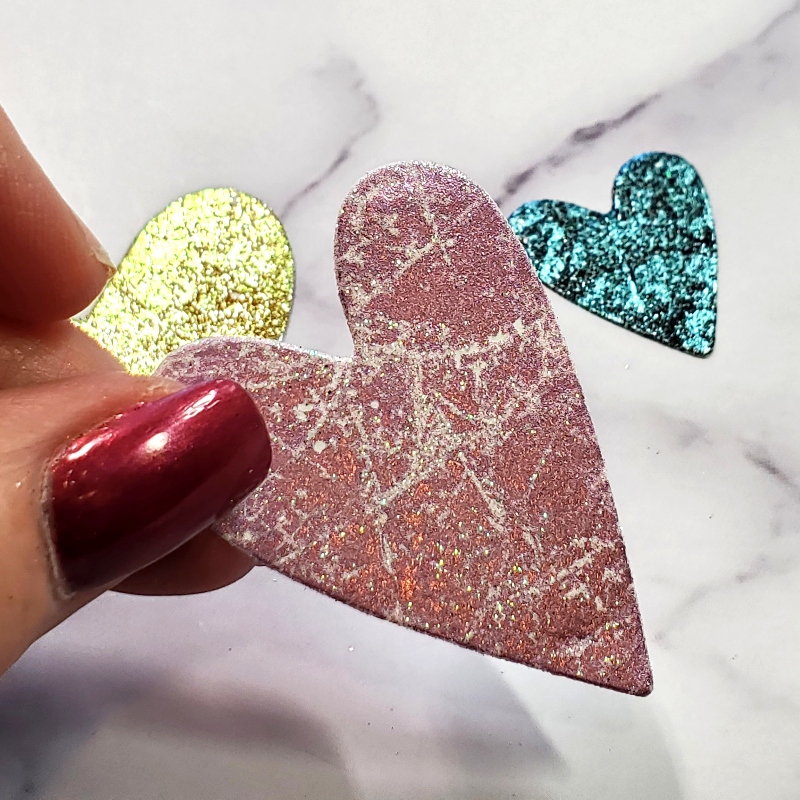
  • Cut foil a little larger than the heart that you are going to cover, then wad it up and roll it in your hands then open it, this is what you'll get.


  • Remove the liner from the heart and place the foil on top with the pretty side of the foil facing up.  
  • Remove the foil to reveal a marbled look which will be sticky so either a different color foil needs to be placed on it and rubbed to fill in the cracks or you can use glitter, fun flock or even embossing powder.


  • Here are three hearts that have just solid foil on top, they're beautiful!


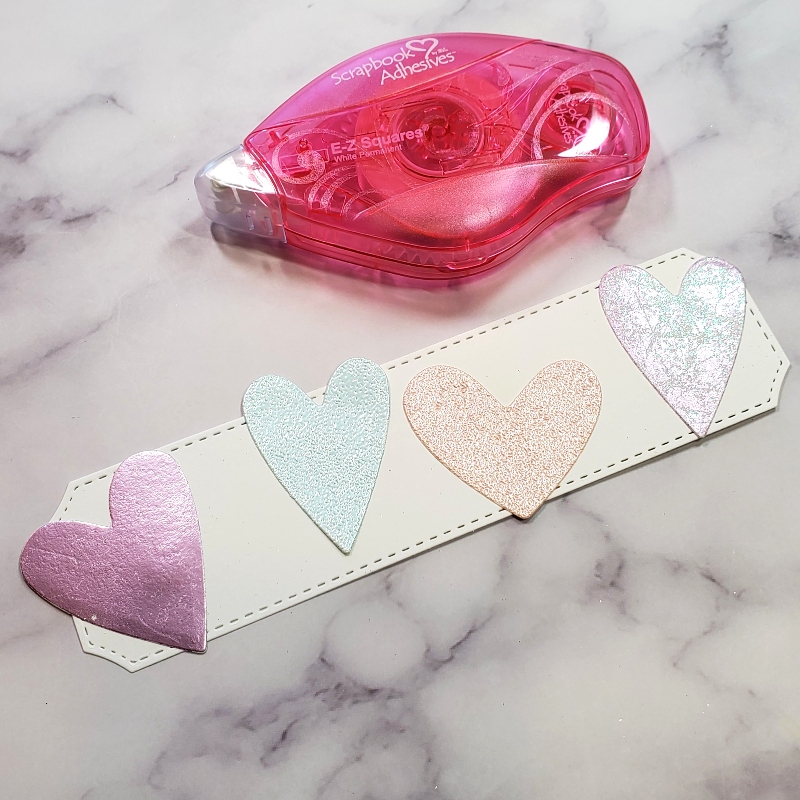
  • White cardstock was die-cut using a slimline die and four hearts were placed spaced apart using and glued flat using a E-Z Runner.  
  • The first heart uses solid pink foil, the blue and pink hearts are embossed with embossing powder and the last heart uses pink foil and the marbling technique.


  • Three hearts will be popped up using 3D Foam Circles and placed in between the hearts on the panel.


  • An additional blue heart was attached flat below the little green popped-up heart.
  • Die-cut a second larger panel from the same slimline die set and pop up the heart panel using 3D Foam Circles.
  • The words were stamped on white cardstock with black ink, cut them out and use the E-Z Runner to attach them flat to the bottom panel.
  • Pop up the panel to a slightly larger pink panel that has been stamped with splatter spots with pink ink.
  • Attach this to a white slimline card.
  • For the final touches, a few pink enamel dots were placed around the hearts and pink Enamel Accents were added to the larger white panel.


Materials used from Scrapbook Adhesives by 3L®

3D Foam Circles White Mix Adhesive Sheets 4x6" Metallic Transfer Foil Sheets Pastel Colors

Plus Stampendous- Word Stamps Whimsy Stamps- Slimline Dies Queen & Co- Enamel Dots


Sunday, May 1, 2022

Summer Memories


Today I have this summer memories card up on the Scrapbook Adhesives Blog
Stamp the image on white cardstock with black ink and color with Prisma colored pencils.
Layer onto slightly larger black and red cardstock using E-Z Squares.


Place 3D Foam Squares on the back of the red panel and set it aside.


Wrap blue buffalo plaid paper with gold and white twine using Premium Double-Sided Tape 1/2" to attach the twine to the back.


Apply 3D Foam Squares to the back of the decorative paper and pop it up on a red card.


Die-cut "memories" from gold glitter paper and glue it to a banner die-cut from white cardstock using the Dual Tip Glue Pen.


Die-cut a helm from blue cardstock and place Micro 3D Foam Squares on the back.


Pop up the stamped image on the right side of the card and pop up the helm on the twine as shown. Glue down the sentiment below the stamped image using the Dual Tip Glue Pen.


Scrapbook Adhesives by 3L has all of the adhesives you need for your crafty projects.


Skill Level: Intermediate

Creative Time: 35 minutes


Materials Needed:

Scrapbook Adhesives by 3L® 3D Foam Squares White Mix 3D Foam Micro Squares White

Home Hobby by 3L® Dual Tip Glue Pen Premium Double-Sided Tape 1/2" 

Plus
Whimsy Stamps- Stamp and Banner Die
Momenta- Helm and Word Dies
PrintWorks Specialty Paper- Cardstock- Gold Glitter, White, Red


Tuesday, March 1, 2022

So Sorry


Do you ever say or do something that maybe you shouldn't?  I'm guessing you do and what better way to say "sorry" than with a cute card that's sure to put a smile on that angry person's face.  I have this card up on the Scrapbook Adhesives Blog today, go check it out and see what the other Designers have been up to.

  • To start, die-cut white cardstock with a rectangle die and stamp the tree stump from the Adorable Otters Set with Onyx Black VersaFine Ink and color with Prisma Colored Pencils.
  • Next clouds were stenciled on the top portion of the rectangle with blue Distress Oxide Inks using a Cloud Stencil from Rubbernecker Stamps.

  • After the otter has been stamped, colored and cut out 3D Foam Circles White Mix were paced on the back.  You want to make sure that you put enough 3D Foam Circles on the back to ensure that the image doesn't sag.


  • After the red tape liner is removed, sprinkle Maroon Micro Glitter on the tape and rub the glitter to make sure all of the tape is covered with glitter.

  • Place E-Z Squares on the back of the otter panel and mount it to a slightly larger brown cardstock panel.

  • Pop up the panel on the card using 3D Foam Circles.


  • Stamp the sentiment below the otter, on the decorative paper with black ink.
  • Place a strip of Extreme Double-Sided Tape 1/4" below the sentiment and add glitter, this tape is thinner than the one used on the white cardstock.

Skill Level: Intermediate

Creative Time: 35 minutes


Materials Needed:

Scrapbook Adhesives by 3L® E-Z Squares 3D Foam Circles Permanent White Mix

Home Hobby by 3L® Extreme Double-Sided Tape 1/4" Extreme Double-Sided Tape 1/8"

Plus
Stampendous- Glitter
Rubbernecker Stamps- Nested Rectangle Die, Cloud Stencil

Have a crafty day 💜

Let's Connect

Affiliate and Product Disclosure
I am on various Design Teams and get free goodies for blogging about craft products but only because I love their products and genuinely use them. Ultimately my opinions are my own. A list of companies is in my sidebar.

Tuesday, February 15, 2022

Will Work For Stamps!


Today I have this bright, cheery and fun card up on the Scrapbook Adhesives by 3L Blog.  I love their adhesives especially when I have a lot of elements stuck down and popped up, with their adhesives I know nothing will fall off!

Here's how I made my card, first I stamped the images on watercolor paper with Onyx Black VersaFine Ink and watercolored them using Inktense Pencils.
Once the shirt is dry, it was stamped with the sentiment using Onyx Black VersaFine Ink.
To cut them out, the matching dies were used.


Die-cut white cardstock using a slimline die and use the E-Z Dots Permanent Runner to attach the flowers and leaves except for the daisies, as shown.


The smaller 3D Foam Circles were used from the Permanent White Mix to pop up the shirt in the center of the card and also pop up the daisies, one on each side of the shirt. You always want to use enough of the 3D Foam Circles so the edges of your images don't droop, that's why I don't just use one in the center of the flower.


Attach the decorated panel to a black and white buffalo plaid card using the E-Z Dots Permanent Runner.
Apply Sunflower Liquid Pearls to the center of the daisies.
Randomly add a few black and white epoxy dots to the card.


Apply Sunflower Liquid Pearls to the center of the daisies and randomly add a few black and white epoxy dots to the card.


Materials Needed Scrapbook Adhesives by 3L® 3D Foam Circles Whtie Mix

E-Z Dots Permanent Runner


Plus
Whimsy Stamps- Stamps
Queen & Company- Epoxy Dots
PrintWorks- White Cardstock

Have a crafty day 💜

Let's Connect!

Affiliate and Product Disclosure
I am on various Design Teams and get free goodies for blogging about craft products but only because I love their products and genuinely use them. Ultimately my opinions are my own. A list of companies is in my sidebar.


Friday, April 30, 2021

A Lovable Llama Birthday


Hi my friends, here's a little peek of my card that I have up on the Scrapbook Adhesives Blog by 3L Blog with step-by-step directions AND it's on my Instagram page for the Scrapbook Adhesives by 3L and Whimsy Stamps Instagram Hop!  You'll want to check it out and play along for your chance to win some wonderful prizes!! Click HERE to go to my Instagram @stampthis.


Have a crafty day!

Let's Connect!

Affiliate and Product Disclosure
I am on various Design Teams and get free goodies for blogging about craft products but only because I love their products and genuinely use them. Ultimately my opinions are my own. A list of companies is in my sidebar.