Featured Post

Privacy Policy

I'm working on a new privacy policy for my followers, but for now you should know that if you comment on my site, my site collects your ...

Friday, May 29, 2015

Hopping With Stampendous and Linnie Bloom

1908142_10203174247272098_6866324387937828000_n

At Linnie Blooms you’re going to find oodles of fun projects to really take your mixed media in a new direction.  Stampendous met this new company at CHA in January, and we immediately had heaps of ideas for using her clever products. What a new dimension to journals, canvases, books, scrapbook pages!  We know you’re going to love seeing the inspiration from this week’s hop!
Plus there are prizes!! Three lucky winners will each win a set of Linnie Blooms Fabric Mini File Folders just like they provide for our team. Plus, you’ll receive a Dreamweaver Stencil background, and our Vintage Press Perfectly Clear Stamps™ Set. You’ll be creating Mixed Media fabric accents in no time!  These winners have to have a U.S. mailing address (official rules here), but Aussie Fans – good news! The Stencil Specialists are sponsoring one Australian prize for this collaboration! You could win a Stampendous stamp, an LL sized Dreamweaver Stencil of your choice, a silicone buttons mould, and a Stampendous Embossing Powder (your color choice)… Wow!! Be sure to let us know you’re from Australia in your comments!!
Here is how my file folder was made-
1.  Spray the file folder with Memories Mists Blueberry Shake and let dry.
2.  Use the LX7028 I Beams stencil and Dreamweaver Stencils Embossing Paste and stencil in the corners, let dry.
3.  Stamp flowers from the Build A Bouquet Set onto painted paper that was made using the Creative Palette Rectangles and cut out using the matching Build A Bouquet Die Set.
Cling Build A Bouquet SetBuild A Bouquet Die Set
4.  Glue the pieces to the front of the file folder with Fabri-Tac glue
5.  Stamp "Spring" from the Happy Greetings Perfectly Clear Set with Denim Adirondack ink and glue to the tab area.
6.  Tie with ribbon.
Jamie Martin (that's me)

If you don’t see the Blog Hop post as soon as you click the link, you may need to click on the header or home button of the blog and scroll a bit to find the post. Some bloggers post for more than one thing each day. If you have trouble commenting on a blog, please let us know at submissions@stampendous.com. Thanks for your patience, designers across several time zones mean every post may not be active immediately.

Stay connected and don't miss a thing!
Follow my blog (in the right column)

Wednesday, May 27, 2015

Getting Crafty With Stampendous and Linnie Bloom

1908142_10203174247272098_6866324387937828000_n

At Linnie Blooms you’re going to find oodles of fun projects to really take your mixed media in a new direction. Stampendous met this new company at CHA in January, and we immediately had heaps of ideas for using her clever products. What a new dimension to journals, canvases, books, scrapbook pages!  We know you’re going to love seeing the inspiration from this week’s hop!
Plus there are prizes!! Three lucky winners will each win a set of Linnie Blooms Fabric Mini File Folders just like they provided for our team. Plus, you’ll receive a Dreamweaver Stencil background, and our Vintage Press Perfectly Clear Stamps™ Set. You’ll be creating Mixed Media fabric accents in no time!  These winners have to have a U.S. mailing address (official rules here). 
Aussie Fans – good news! The Stencil Specialists are sponsoring one Australian prize for this collaboration! You could win a Stampendous stamp, an LL sized Dreamweaver Stencil of your choice, a silicone buttons mould, and a Stampendous Embossing Powder (your color choice)… Wow!! Be sure to let us know you’re from Australia in your comments!!


I got a three pack of fabric file folders from Linnie Blooms and thought they could be turned into little mini memory books for the different seasons.  Today I'm sharing one I made for Fall.
1.  Sprayed the file folder with Sunset Orange Adirondack spray and let dry.
2.  A while ago I  made a bunch of background papers using my Creative Palette Rectangles (this one is my favorite!!) and acrylic paints.
Creative Palette Rectangles
I grabbed one of the papers that had pink, orange and white paints, stamped the roses from the Build A Bouquet set and used the matching Build A Bouquet Die set to cut them out. Then did the same thing with the daisies and leaves.
Cling Build A Bouquet SetBuild A Bouquet Die Set
3.  The stamped pieces were layered onto a strip of jute ribbon and glued to the file folder with Fabri-Tac glue.
4.  Frantage Mica Fragments were added to the jute ribbon by applying random spots of Zip Dry glue and sprinkling on Mica.
Frantage Mica Fragments
5.  The black letters are die cut using Dreamweaver Stencils Dual Alphabet Dies and glued onto the folder using Fabri-Tac glue.
6.  Gold Dot Sparklers were added to the F for a touch of bling.


If you don’t see the Blog Hop post as soon as you click the link, you may need to click on the header or home button of the blog and scroll a bit to find the post. Some bloggers post for more than one thing each day. If you have trouble commenting on a blog, please let us know at submissions@stampendous.com. Thanks for your patience, designers across several time zones mean every post may not be active immediately.

Stay connected and don't miss a thing!
Follow my blog (in the right column)

Monday, May 25, 2015

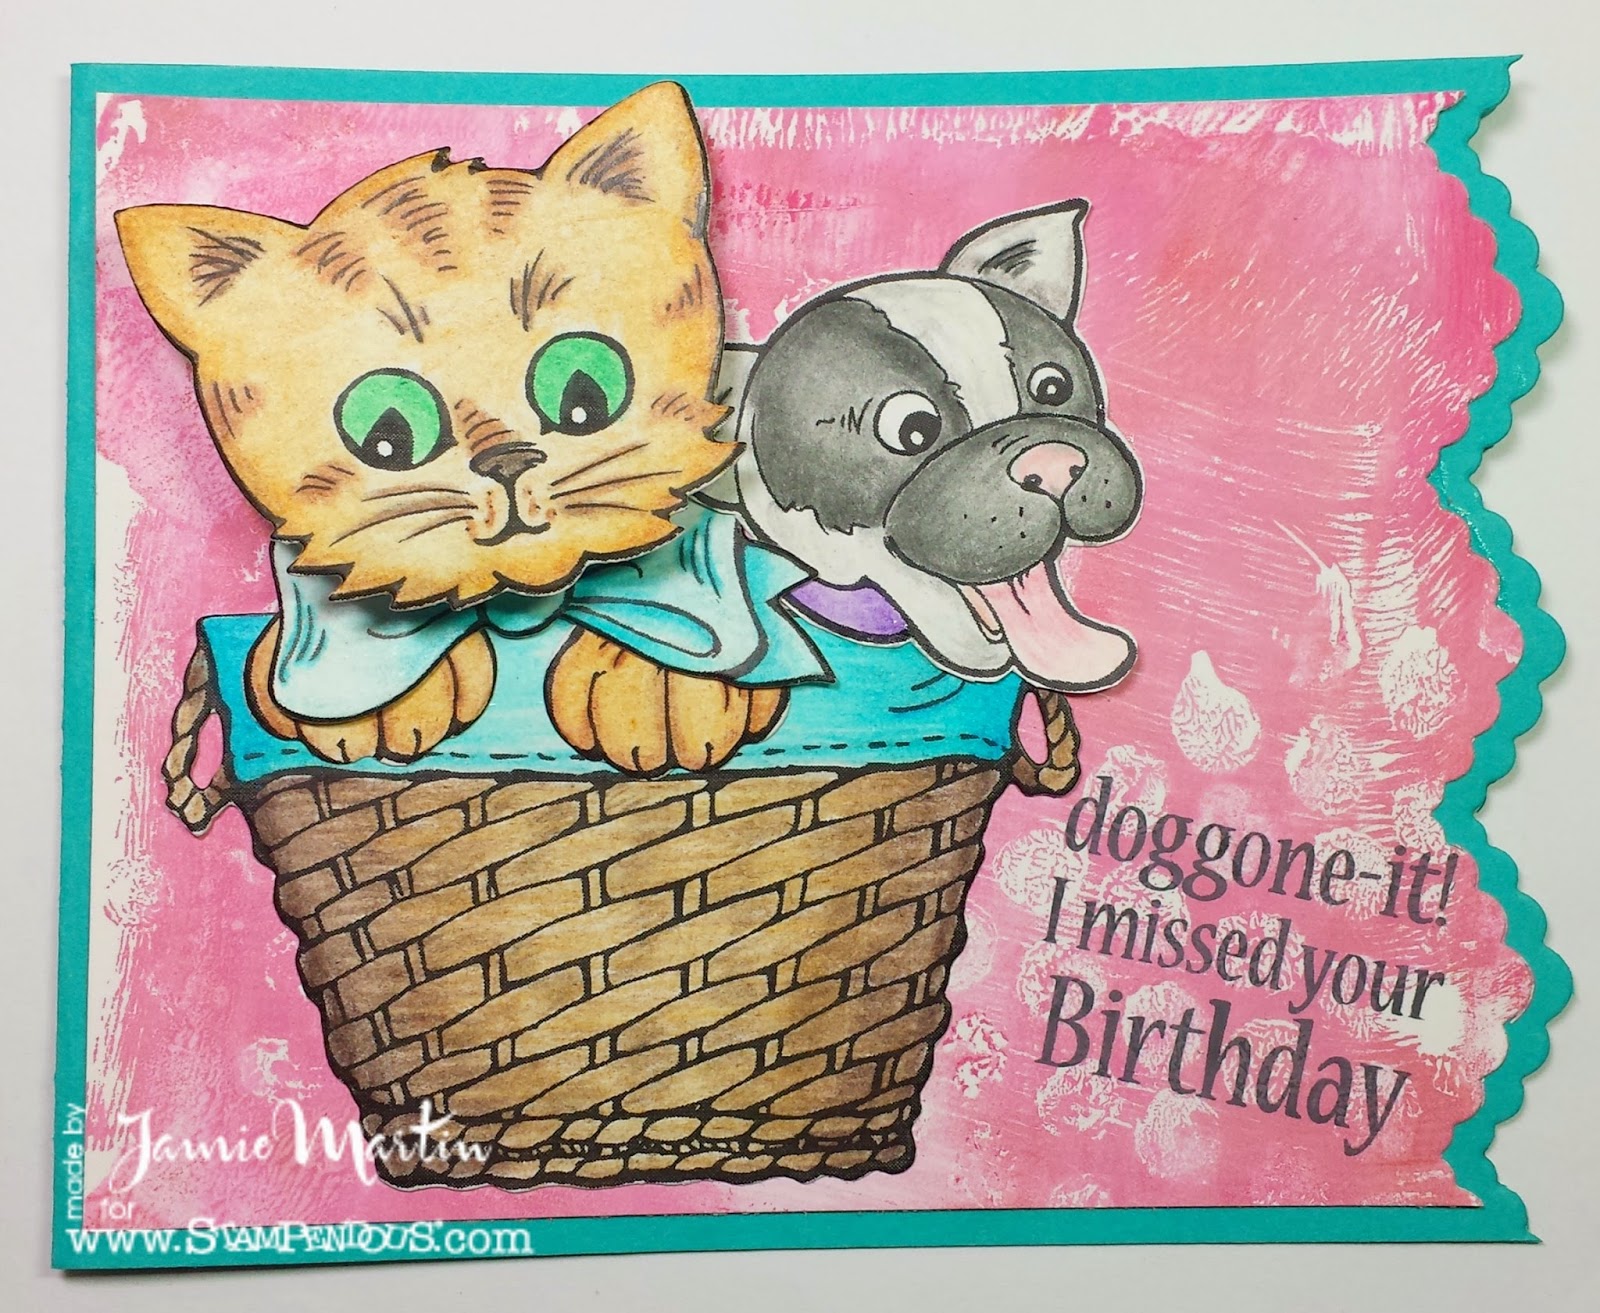
Doggone-it!


This week the Stampendous Design Team is sharing Pop Up Puppies! They are so cute and can be used in a ton of different ways.  On my card I added a kitty friend for my puppy.  These stamps have matching dies available and what you can't see is the kitty head moves because it is mounted on a AW Wobble which is like a plastic spring...so much fun!!

Be sure to stop by later in the week, we are have a Blog Hop with Linnie Bloom and the designers are breaking out their creativity to share some amazing projects with you.  And oh yes, there will be prizes!!

1. Using the Creative Palette Rounds, make the background paper with pink and white acrylic paints.  While the paint is on the Palette, stamp into it with a clean stamp that comes with the Palette.  This will remove the paint so you get a white image or a lighter image.
2. Once dry cut the edge with a die from the Build A Pop Up Die set, do the same to a teal card and layer pieces. Set aside.
3. Stamp images from the Pop Up Kitties and Pop Up Puppies on white paper with black ink and color with pencils.  You can color them to look like your pet, this is my little dog Mini who isn't very mini hahaha.

4. Cut out using the match dies Pop Up Kitties Dies and Pop Up Puppies Dies.
5. Glue pieces as shown, the Kitty head is popped up using a AW Wobble so it gives dimension and it moves!
6. Stamp saying from the Dog Sayings Perfectly Clear set on the bottom right with black ink.

Supplies

Plus:
Cardstock by Bazzill Basics Paper®
Zip Dry™ Paper Glue by Beacon Adhesives
AW Wobbles
Acrylic Paints

Stay connected and don't miss a thing!
Follow my blog (in the right column)

Wednesday, May 20, 2015

Life Is A Picnic


I'm loving this warm weather and now is the perfect time to gather friends and family for a picnic!  Stampendous has the perfect stamps to help you celebrate some of your summer activities. Here is how my card was made.

1.  Stamp Lunch Line and Life Picnic on with paper in black and color with pencils.  Layer onto black paper.
2.  Stamp Picnic Ants at the bottom of decorative paper in black, layer onto black and glue to a red card.
3.  Mount stamped piece to card.


Plus:
Cardstock by Bazzill Basics Paper®
Zip Dry™ Paper Glue by Beacon Adhesives
Colored Pencils

Stay connected and don't miss a thing!
Follow my blog (in the right column)


Monday, May 18, 2015

Eat Dessert First


1.  Stamp Cupcake Ant on white paper, sponge the top with blue ink, color with pencils and layer onto red and blackpapers.  Set aside.
2.  Stamp Picnic Ants on white paper, color under the ants with a green pencil and cut out in a wave pattern.  Layer onto red paper, cut out following the same wave pattern then layer onto black paper and do the same.  Set Aside.
3.  Apply black photo corner mounts to red and white decorative paper, glue to a read card and attach pieces as shown.  The Cupcake Ant is popped up with foam squares.

Stampendous
Plus:
Cardstock by Bazzill Basics Paper®
Zip Dry™ Paper Glue by Beacon Adhesives
3D Foam Squares Scrapbook Adhesives by 3L
Colored Pencils
Black Photo Corners
blue ink

Stay connected and don't miss a thing!


Friday, May 15, 2015

Stampendous and Clear Scraps Blog Hop


This week we are playing with some fantastic products from our friends at Clear Scraps and excited to share our finished projects. You can image how much fun it is to have a clean canvas to start with but when you use Clear Scraps it’s a see-through canvas!

Clearly we have prizes!!! We have three prize packages up for grabs, each will include our Cling Jumbo Filigree Stamp Set, a Jumbo Perfectly Clear Acrylic Handle, PLUS a Clear Scraps Mixable Album and some extra acrylic accents! Comment on our blog and each designer’s blog of the day throughout this week of our hop and the winners will be announced Monday, May 18th. Official Rules apply for Stampendous prizes. Please let us know where you live. As you know, prize winners have to be US residents EXCEPT….
Aussie Fans – Look HERE!An exciting treat for our fans “down under”!!
The Stencil Specialists , one of our Australian Wholesale Distributors, is going to offer a prize to one Australian fan every time we have a giveaway for US fans!!
How completely exciting and generous! Plus, they’re stocking way more than stencils from Stampendous now!
For the Clear Scraps Blog Hop week, The Stencil Specialists are offering:
A Stampendous Stamp, A Dreamweaver Stencil (LL size customer choice), A Silicone Mould,  A Tub of White Ultra Light Paper Clay and 3 packs of Adhesive Gems.  WOW… Now there’s a prize package! Comment each day on the Stampendous and participating designer blogs and be sure to include in your comment which area of Australia you live in! We’ll announce the winner the following week!


I've had this canvas partially done for quite a while and when I was given this Clear Scraps frame I thought it would be the perfect time to complete it.  
1. Two of the canvas corners were stenciled with Dreamweaver Stencils LJ896 Large Flourish using Dreamweaver Stencils Embossing Paste.  
2. The canvas was then painted , I didn't like how it turned out so I gessoed over it and repainted.  
3. The two empty corners were stenciled with Dreamweaver Stencils LX7001 Damask with Crimson Pearlescent Brilliance. Set canvas aside.
4. After removing the film from both sides of the Clear Scraps frame, Beacon Adhesives Fast Finish was dripped on the frame here and there, then sprinkled with Copper Lux Mix.  Let dry and shake off the excess.
5. Sponge DecoArts Traditions acrylic paints in Raw Sienna and Red Violet on the same side as the Copper Lux Mix.  Let dry and glue to the canvas using Beacon Adhesives 3 in 1 Glue.
6. Stamp Timeless Rose twice with Tuxedo Black Memento ink and color the rose on one and cut out.  Color everything but the center rose on the other, color both with colored pencils.
7.  Brush both pieces with Fast Finish, this makes it a bit shiny and intensifies the colors.
8. Brush the center of the canvas with DecoArts Decoupage, lay the leaf piece and brush over piece with Decoupage.  Let dry.
9. Pop up the cut out rose with foam squares.


Here are the gorgeous Clear Scraps/Stampendous Stamps/Dreamweaver Stencils projects our Designers have made for your inspiration!
Jamie Martin (that's me)


Stay connected and don't miss a thing!
Thursday, May 14, 2015

Stampendous Is Playing With Clear Scraps


This week we are playing with some fantastic products from our friends at Clear Scraps and excited to share our finished projects. You can image how much fun it is to have a clean canvas to start with but when you use Clear Scraps it’s a see-through canvas!

Clearly we have prizes!!! We have three prize packages up for grabs, each will include our Cling Jumbo Filigree Stamp Set, a Jumbo Perfectly Clear Acrylic Handle, PLUS a Clear Scraps Mixable Album and some extra acrylic accents! Comment on our blog and each designer’s blog of the day throughout this week of our hop and the winners will be announced Monday, May 18th. Official Rules apply for Stampendous prizes. Please let us know where you live. As you know, prize winners have to be US residents EXCEPT….
Aussie Fans – Look HERE!An exciting treat for our fans “down under”!!
The Stencil Specialists , one of our Australian Wholesale Distributors, is going to offer a prize to one Australian fan every time we have a giveaway for US fans!!
How completely exciting and generous! Plus, they’re stocking way more than stencils from Stampendous now!
For the Clear Scraps Blog Hop week, The Stencil Specialists are offering:
A Stampendous Stamp, A Dreamweaver Stencil (LL size customer choice), A Silicone Mould,  A Tub of White Ultra Light Paper Clay and 3 packs of Adhesive Gems.  WOW… Now there’s a prize package! Comment each day on the Stampendous and participating designer blogs and be sure to include in your comment which area of Australia you live in! We’ll announce the winner the following week!


I was hoping to photograph this outside in natural light but it has been raining like crazy!  The tag looks blurry on every picture I have taken but IRL it doesn't, it is really beautiful.

1.  Start with a Clear Scraps tag and remove the frosty film from both sides.
2.  Apply stream and lettuce alcohol inks to one side of the tag and when dry stamp on the other side with Wild Rose stamp using black StazOn ink and let dry.
3.  On the alcohol ink side,  color the stem with Spectrum Noir alcohol markers JG5, the center of the flower with CT4 and outline the  lines around the center with TB5.
4.  Trace the tag onto white cardstock, cut out and glue to the alcohol ink side of the tag using Fast Finish by Beacon Adhesives. Tie with ribbon and twine.  Set aside.
5.  Die emboss half panel of white cardstock with Design I Beam Stencil DWLX7028 by running it through your die cut machine using the embossing plates and a rubber embossing mat.
6.  Once embossed leave the stencil on the paper and sponge with turquoise ink.
7.  Stamp the top half with Vintage Contract using Delicata Golden Glitz ink.
8.  Glue green ribbon to the center and pop up the tag with foam squares.
9.  Stamp Thank You from the Royal Hearts Quotes Perfectly Clear Set using Tuxedo Black Memento.


Here are the gorgeous Clear Scraps/Stampendous Stamps/Dreamweaver Stencils projects our Designers have made for your inspiration!
Clear Scraps Blog

Today we also have some of our Stampendous Design Team members sharing projects that use Dreamweaver Stencils, here are their links.
Jamie Martin (you are here)
Stay connected and don't miss a thing!