Featured Post

Privacy Policy

I'm working on a new privacy policy for my followers, but for now you should know that if you comment on my site, my site collects your ...

Showing posts with label I Brake For Stamps. Show all posts

Sunday, February 19, 2017

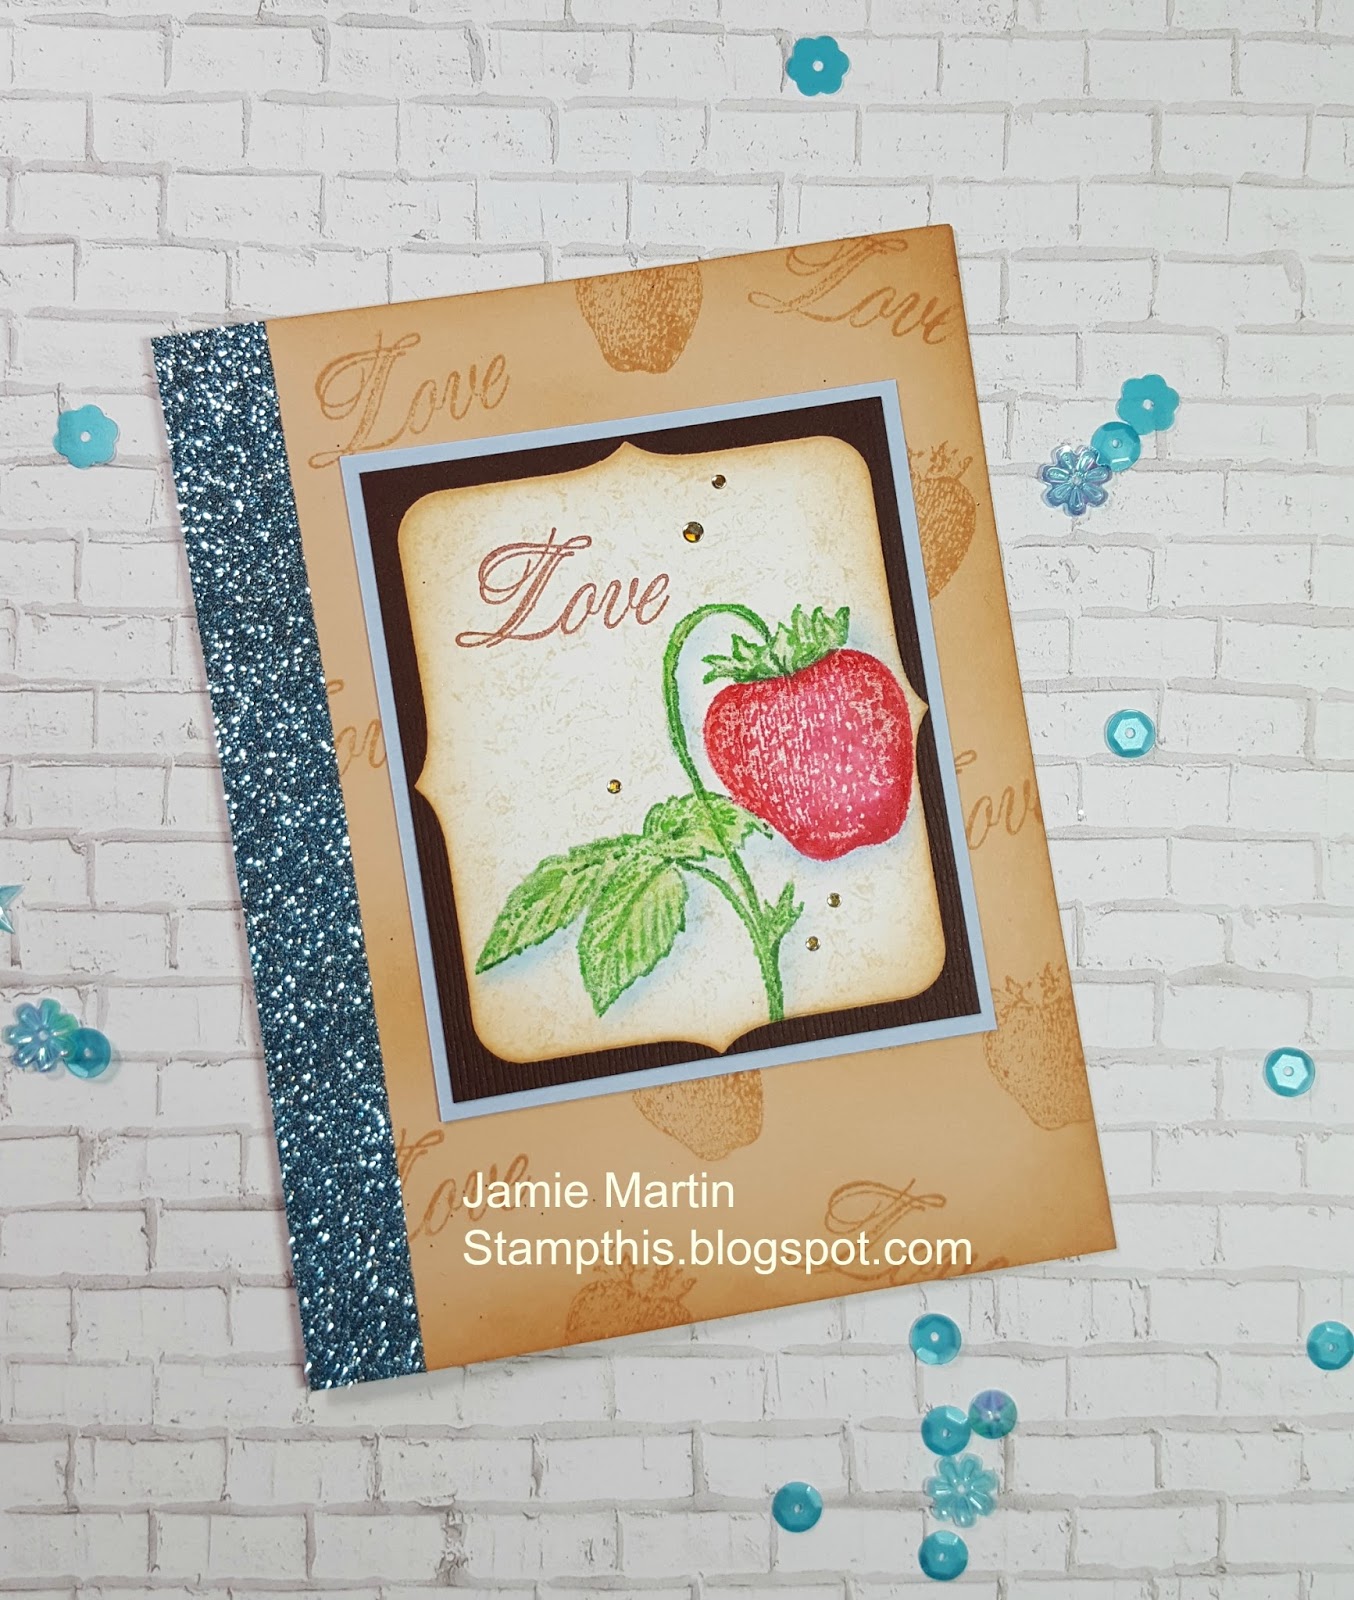
Lovely Fruit


Hi stamping friends, today sharing a sparkly, fruity, love card made with stamps from I Brake For Stamps. To make my card, I colored the strawberry from the I Brake For Stamps Fruit and Flowers Sheet set, with Zig Clean Color Real Brush Pens and stamped it on a white die cut panel. It was then colored with Prisma pencils.  The panel was sponged with Tea Dye ink and layered onto brown and blue papers. This was then glued to a tan card that was randomly stamped with Love and a small strawberry, from the same set using Tea Dye Ink. Tea Dye Ink was sponged around the card and blue glitter washi tape was added to the side. To add a bit more interest, gold Dot Sparkler stickers were added to the stamped panel.

Stop by the I Brake For Stamps website and take a look at the large variety of stamps they carry.  Be sure to use the coupon code SAVE10JAMIE to get 10% off your order.

Thank you for stopping by today and I hope I have inspired you to Stamp This!

Stay connected and don't miss a thing!

 Follow Stamp This 
(I follow crafty people back!)


Sunday, February 12, 2017

Ombre Birthday Card


Happy Sunday, today I'm sharing an ombre birthday card using the resist technique.  I made this using the Large Fritillaria and Dot Letter Happy Birthday stamps from I Brake For Stamps. The ombre look is really popular right now and I can see why, it's a beautiful! 

To make this card-
1.  I repeatedly stamped Large Fritillaria on a white panel with VersaMark ink and embossed it with clear.  
2.  Then I started off by sponging Tumbled Glass ink, from the top working my way down.  When I sponge, I used the round foam sponges and cut them into quarters.  I have the sponging tools but if find that I'm always reaching for the sponges.
3.  Next Salty Ocean was sponged to about the middle of the panel.  
4.  Lastly Faded Jeans was sponged at the top. When done I rubbed the embossed areas with a paper towel to remove any remaining ink.
5.  Dot Letter Happy Birthday was stamped on a black strip of paper with VersaMark Ink and embossed with white embossing powder.  This was then glued onto the ombre panel with Zip Dry Glue.
6.  Dot stickers were added to the panel and it was then glued to a larger black panel to make the colors pop and mounted onto  a white card.

Head on over to the I Brake For Stamps website and take a look at all of the stamps that they have.  If you order, be sure to use the coupon code SAVE10JAMIE to save 10% off your order!

I hope I have inspired you to Stamp This!


Sunday, February 5, 2017

Some Things Are Better Rich


Happy Sunday, that means it's time to post a card made with stamps from I Brake For Stamps.  Today I'm sharing a fun and funny card to give to a friend, just because. Sometimes you want to send a card for no specific reason other than to put a smile on their face.

To make this card;
1.  Stamp the sentiment (all stamps from MS79 Full Plate of Coffee and Sayings Set) on white cardstock with Onyx Black VersaFine Ink and embossed it with clear embossing powder.
2.  Now it's time to layer.  Layer the stamped panel onto a white panel that is slightly smaller than a card, then layer that panel onto a white card.
3.  Holding the panels firmly in place, randomly stamp the coffee beans with Sepia VersaFine Ink, on all 3 panels being sure to have the coffee beans stamped off the edge of all panels.
4.  Heat set to dry ink then sponge the edges of all panels and card with Tea Dye Distress Ink.
5.  Layer the two panels on black paper and glue to card with Zip Dry Glue.

I hope I have inspired you to Stamp This!


Sunday, January 29, 2017

Funky Flower


Hi, it's Sunday to it's time again to share a card made with stamps from I Brake For Stamps.  Here's a friendship card made with Sending Smiles and Funky Cone Flower.  When buying a stamp, keep in mind you don't always have to use all of the stamped image.  The Funky Cone Flower stamp has a pretty swirl background around the flower, but today I'm only using the flower part of the stamp. You can see a card I made HERE that used all of the stamped image.

Here is how my card was made;
1.  Stamp Funky Cone Flower on watercolor paper with Onyx Black VersaFine ink, heat set and color only the flower with Staedtler colored pencils. Cut out the flower only and set aside.
2.  The background panel was made by scribbling different colors of Gelatos on watercolor paper and it was then rubbed with a baby wipe to blend. Once dry, I rubbed Mowed Lawn Distress Ink on my craft mat and picked it up with a wet paint brush and flicked water drops on the panel and let it dry.
3.  Stamp Sending Smiles at the top of the panel with Onyx Black VersaFine ink.
4.  I diecut a frame from black glitter paper and glued it to the panel with Art Glitter glue.
5.  The Funky Cone Flower was popped up over the frame with foam squares.
6.  Black Dot Sparklers were randomly place on the panel.
7.  The panel was layered onto a larger black panel and glued to a white card with Zip Dry Glue.

If you buy anything from the I Brake For Stamps website, be sure to use the coupon code SAVE10JAMIE to receive 10% off your order.


Sunday, January 22, 2017

Life Before Coffee?


Happy Sunday, and that means today I'm sharing a card made with stamps from I Brake For Stamps. I have a clean and simple card using the MS79 Full Plate of Coffee and Sayings Set.  Last week I made a coffee card using the same set but it has a completely different look, you can see it HERE.  The card I made last week, was quite a bit more complex.  So this week I wanted to show that these stamps are also perfect to use if you need a card in a hurry.

Here is how it was made;
1.  Stamp coffee cups three times across the bottom of a white panel with Leaf Archival Ink.
2.  Wrap black and white ribbon around the panel, above the coffee cups.  Diecut a red heart and glue on top of the ribbon.
3.  Stamp the sentiment above the ribbon off to the left side with Leaf ink and add black Nuvo Crystal Drops, set aside to dry. When dry tape to a black card.


Sunday, January 8, 2017

To Brighten Your Day


Today I'm sharing a pretty flower card that's sure to brighten anyone's day.  It was made with the Large Fritillaria and Sending Smiles stamps from I Brake For Stamps. Here is how the card was made.

1.  1 1/2' was cut off the bottom of a white card and the remaining portion was randomly stamped with the Large Fritillia stamp with Leaf Green Archival Ink.
2.  The Large Fritillaria was stamped on separate white card stock with Leaf Green and Aquamarine Archival Inks, then cut out.
3.  A strip of green paper was glued to the bottom of the white card and the flowers were glued to cover up the seam.  Rhinestones were placed in the center of the flowers.
4.  Nuvo Crystal Drops in Caribbean Ocean were randomly added around the flowers.  Set aside to dry.
5.  Stamp Sending Smiles on acetate with Jet Black StazOn Ink.  Cut it out and glue to the card with Glossy Accents.

Head on over to the I Brake For Stamps website to see what they have and be sure to use the coupon code SAVE10JAMIE to get 10% off your order.

Sunday, January 1, 2017

Happy Birthday


Happy New Year, hope you had a fun and safe New Year's Eve!  For my first card of 2017, I have a birthday card made with the Funky Cornflower from I Brake For Stamps.  It was stamped with Onyx Black Versa Fine ink and embossed with clear powder.  Then it was colored with Zig Clean Color Real Brush Pens and cut out.
Decorative yellow paper was layered onto a larger black panel and set aside.

I just happen to have a stencil that matched the swirl background of the flower perfectly.  The stencil was laid on a purple top folding card and stippled with Wilted Violet Distress Ink.  All of the pieces were glued onto the card as shown.  The card was then tied with green ribbon, the Happy Birthday banner was glued under the ribbon and Crushed Grape Nuvo Crystal Drops were added.

Sunday, December 18, 2016

How've You Bean?


Who can use a hot cup of coffee to warm up today?  Boy is it cold here in Oklahoma!! So today's card is to share friendship and warmth.  The stamps are from I Brake For Stamps and are a full sheet of Coffee, Coffee Beans and Sayings.  If you order anything from the I Brake For Stamps website, be sure to use my coupon code SAVE10JAMIE to save 10% off your order!  
Here is how it was made;

1.  Stamp the roasted coffee beans bag on watercolor paper with Onyx Black VersaFine ink and emboss with clear.  
2.  Color with Zig Clean Color pens and use the Fitted Frames set from Stampendous, to die cut the image and use the larger die to cut a frame from blue paper.  Sponge the edge of the watercolor piece with brown ink and the blue frame with dark blue ink.  Glue together and set aside.
3.  Randomly stamp coffee beans on decorative paper with brown ink, wrap with ribbon and glue onto a blue card.
4.  Stamp sentiment on blue paper with brown ink and pop up on card after the coffee bag piece has been glued down.


Sunday, December 11, 2016

Sending Smiles


Winter's just beginning and I'm ready for Spring, so I'm sharing a Spring inspired card.  I really like this saying, Sending Smiles, from I Brake For Stamps, it's pretty versatile.  I paired it with the Large Fritillaria stamp which is one flower that I stamped multiple times with VersaMark ink and embossed with clear powder.  Squeezed Lemonade, Wild Honey and Abandoned Coral Distress Inks were sponged over the flowers, then the embossed area was rubbed with a paper towel to remove the ink.  Some diluted Abandoned Coral was splattered over the card the Sending Smiles was stamped with Onyx Black VersaFine Ink. A gold gem was placed in the center of one of the flowers and gold stickers were placed randomly around the sentiment.  The panel was then glued to an orange card.


Sunday, December 4, 2016

Going Shabby Chic


For today's I Brake For Stamps post, I'm going with a shabby chic style card.  I have a Prima pad of paper and thought it would be perfect for this style of flower stamp, from the Fruit and Flowers Sheet set. Here's how my card was made;

1.  The flower was stamped with Worn Lipstick Distress ink, the edges were sponged with Tea Dye and Worn Lipstick.
2.  The word flowers was randomly stamped with Tea Dye ink, stamping twice before reinking.
3.  The bottom was die cut using a Spellbinders die and pink pearls were placed in the centers.
4.  This was layered onto brown cardstock and tied with pale pink ribbon.
5.  Then it was layered onto pink cardstock and glued onto a dark brown card.

If you order anything from the I Brake For Stamps website, be sure to use my coupon code SAVE10JAMIE to get 10% off your order.

Sunday, November 27, 2016

Birthday Time!


Happy Sunday!  And that means it's time for my,  I Brake for Stamps post. I used the  Party Balloons and  Dot Letter Happy Birthday to make a fun and festive birthday card.  I made a card using these same stamps a few weeks ago and it looks completely different, you can see it HERE.

The Party Balloons were stamped with Onyx Black VersaFine ink and embossed with clear embossing powder.  They were then colored with Zig Clean Color pens. I stamped Happy and Birthday separately even though they are one stamp. Happy was stamped on a tab that was punched from orange paper and Birthday was stamped in black below the balloons.  The whole stamp was stamped with blue to make the background.

Stop by the  I Brake for Stamps website to see the wide variety of stamp they carry. Be sure to use my coupon code SAVE10JAMIE to get 10% off of your order!


Sunday, November 20, 2016

All Occasion Note Cards


Some of my favorite cards to make are clean and simple, they look so fresh and pretty.  That's the style I used to make some note cards using stamps from I Brake For Stamps.  The roses and words are from the Fruit and Flowers Sheet set, and I really like the Victorian look that they have.

To make the green card, the roses were stamped on a white panel with Peeled Paint Distress ink. A thin strip of Scor-Tape was placed below the roses, Beautiful was stamped below that three times and then more Scor-Tape was placed below that.  The liner was then removed and ultra fine gold glitter was rubbed on the tape.  This as then layered onto a green panel and mounted to a white card. As a finishing touch a few gold Dot Sparklers were added around the roses.


If you order anything from the I Brake For Stamps website, be sure to used my coupon code SAVE10JAMIE to get 10% off your order.


Sunday, November 13, 2016

Birthday Balloons


It's time again for my Sunday, I Brake for Stamps post and today I have a birthday card for you. It has a little shine, a little sparkle and a little dimension.

Here is how my card was made;

1.  Party Balloons were stamped on watercolor paper with Onyx Black VersaFine ink and embossed with clear embossing powder.
2.  The balloons were colored with Zig Clean Color pens, Glossy Accents was used on top of the balloons and set aside to dry.
3.  Once dry Distress Inks in Pistachio, Salty Ocean and Faded Jeans were sponged over the panel.  Use a paper towel to rub the ink off the balloons and embossed area. Glue to a black card.
4.  Stamp Dot Letter Happy Birthday on white paper with Onyx Black ink, emboss with clear.  Cut the words apart and layer onto black paper.  Add a few dots of Caribbean Ocean Nuvo and let dry.
5.  Pop up Happy at the top of the card and glue Birthday to the bottom.
6.  Add black Dot Sparklers and some sequins.

Head on over to the I Brake For Stamps website and see the wide variety of stamps they carry.  And if you place an order, be sure to use my coupon code SAVE10JAMIE to save 10%!


Sunday, November 6, 2016

Love and Fruit


Hi, today I'm sharing a card made with fruit and words from the I Brake For Stamps, Fruits and Flowers Sheet stamps.  

To make this card the grapes were randomly stamped on a white panel with purple ink and Love was stamped with green ink. A strip of glitter paper was glued to the left side and triangles in the left corners. This was then glued to a black panel and set aside. 

Glossy paper was used for the tag and Love, from the set, was repeatedly stamped with VersaMark ink. The tag was then sponged with green ink. The bottom was torn, layered onto black paper and Love was stamped with Tuxedo Black Memento ink.  A charm was glued on with 3 in 1 Glue. The tag was tied with purple ribbon and glued to the card.


A white card was randomly stamped with Love in green ink, the edges were sponged and the stamped panel was glued onto the card.

If you order anything from the I Brake For Stamps website, be sure to use my coupon code SAVE10JAMIE to receive 10% off your order!

I hope I have inspired you to Stamp This!


Sunday, October 30, 2016

A Pearfect Hello


Here is the pearfect card to give to a friend. The pears are from I Brake For Stamps new Fruits and Flowers Sheet, were stamped three times with Leaf Green Wendy Vecchi Archival Ink, masked and sponged with brown ink.  Once done the masks were removed to reveal the uninked pears and it was layered onto black paper.

For the background paper, the word pear was randomly stamped on a white panel with Shabby Shutters Distress Ink, the edges were sponged and ribbon was tied around the bottom.  The panel was then glued to a black card with Zip Dry Glue. Hello was diecut from black paper and glued to the center pear.

You can see a card I made with this set a couple of weeks ago by clicking HERE.

You can get 10% off your order from the I Brake For Stamps Website by using my coupon code SAVE10JAMIE


Sunday, October 16, 2016

Shabby Chic Fruit


I have some exciting news today, I am now on the design team for I Brake For Stamps and this is my first blog post as one of their design team members!!

Today I have a shabby chic card that was made using the new Fruit and Flowers Sheet from I Brake For Stamps.  Here is how it was made;

1.  I diecut white cardstock using Fitted Frames A and took some plastic wrap (like you use in your kitchen), wadded it up, tapped it on a Sand ink pad and stamped it onto my paper.  I didn't want the background to be bright white. This was repeated until I was happy with how it looked.  The edges were sponged with the same ink.
2.  The strawberry from the Fruit and Flowers Sheet was then stamped with VersaMark ink and embossed with PEARLustre Champagne Embossing Powder.

3.  It was then colored with Zig Clean Color pens and shadowed with decorative chalk.
4.  Fruit from the same stamp set was stamped with Lettuce Adirondack ink and gold Dot Sparklers were added.  This was layered onto dark green decorative paper with Zip Dry Glue and set aside.
5.  A Lattice die from Spellbinders was used to cut white cardstock.  A VersaMark ink pad was smooshed on top of the diecut piece and Aged Rose Embossing Enamel was sprinkled on the ink and heat embossed.
6.  The lattice was taped to the top half of a 5 1/4" x 4" white panel that had the same plastic wrap stamped background as the strawberry panel. The over hang was cut off.
7.  Green decorative paper was glued to the bottom portion of the panel and a gold paper strip was glued over the seam.
8.  Strawberry was stamped on a diecut piece that was prepared the same as above  and stamped with Victorian Velvet Distress ink.  Gold Dot Sparklers were added and the piece was popped up with 3D Foam Squares from Scrapbook Adhesives by 3L.

You should click on the badge below and take a look at what I Brake For Stamps carries, they have quite a variety of stamps by many companies. If you find something you like, which I know you will, you can get a 10% discount off your order by using my coupon code: SAVE10JAMIE