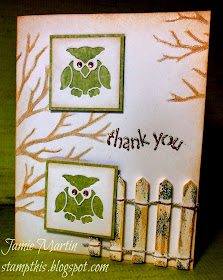
1. Being the craft hoarder that I am I had the negative of the Leafless Tree I used on my last post, so I used that as a stencil and sponged Antique Linen and Tea Dye Distress inks onto a white card. I then out lined the limbs with a glitter Gelly Roll pen to add some pretty shimmer.
2. Then the owl was die cut onto two white squares, the edges were sponged with Antique Linen and glued onto green decorative paper with Zip Dry Glue. to finish the little owl off, brown self adhesive rhinestones were used for the eyes.
3. Thank You was stenciled on the card with White Dreamweaver Stencils Embossing Paste, then sprinkled with Aged Green Embossing Enamel from Stampendous while wet, then heated with a heat gun.
4. Last Christmas I found row of a little white fence at Hobby Lobby and bought 3 packages since they said they only carry it at Christmas. So if you like it start looking for it now, I'm sure they are putting this stuff out already. So with wire cutters, I cut it to size, rubbed Toffee VersaFine on the edges, sprinkled it with Aged Green Embossing Enamel and heated it holding the heat gun up high so too much of the powder wouldn't blow off.
5. The edges of the card was sponged with Antique Linen, the fence was glued on with Fabri Tac by Beacon Adhesives (it dries strong and quickly), and the owls were popped up with foam tape.
Stay connected
Follow my blog (in the right column)
Follow me on Pinterest
Follow me on Twitter
Follow me on Instagram- stampthis
Facebook
Now go see what the other designers have created!
Play along with our monthly challenge and add the link to your project here!
Now go see what the other designers have created!
and
Terri Sproul
(GD)
Play along with our monthly challenge and add the link to your project here!


So cute Jamie! Love how you used the negative of the leafless tree...nice hoarding skills!
ReplyDeleteThis is so adorable Jamie. Love how the tree branches come in from the side and that adorable picket fence...just brilliant!
ReplyDeleteWootie hoot hoot!!! Gorgeous designwork...Tom Sawyer needs to go to work on that fence! lol Love how you just backed "tiny owl" with the green paper, good to see him done easily as he has so many tiny pieces. Lots of detail in this one Jamie a real piece of art.
ReplyDeleteVery cute! Loving the owls, and your use of the negative space from the Leafless Tree die.
ReplyDeleteVery cute!
ReplyDeleteJamie, this is such a cute card! I love those little owls and had intended to use them for my card today until I saw my inspirational piece...squirrel! Anyway, your card is adorable and the added touch of the fence was perfect! Very nicely done!
ReplyDeleteVery cool how you decorated the fence, and love the use of the negative portion of the owls over the decorative paper!
ReplyDelete:D I'd use this one for Halloween or Fall. So cute and Fall is nearly here. thank you, -con
ReplyDeleteI love the fence on this and the owls eyes are so cool. It makes them really stand out.
ReplyDelete